
The Back-to-Back Class II Composite: A Predictable Workflow for One of the Most Common Clinical Procedures
While it may be one of the most common procedures in most restorative dental offices, the efficient placement of multiple Class II composites in a single quadrant can be technically demanding. Creating strong and natural proximal contours and contacts with the restoration of even a single Class II composite restoration can pose a challenge using traditional matrix systems. The challenge intensifies when back-to-back Class II composites are placed at the same appointment. There are options to consider when placing a quadrant of Class II composites: Is it possible to place two matrices back-to-back and restore simultaneously? Do you restore one Class II completely before restoring the adjacent tooth? Do you place as many matrices as possible and alternate teeth? Whatever technique you choose, the final restorative result of each restoration must mimic the esthetics and function of the natural tooth, be comfortable to the patient post-operatively, and withstand the stresses of the masticatory cycle for years to come. There is less emphasis on esthetics while your technique functionally must result in naturally contoured marginal ridges and appropriate proximal contact strength, shape, size, and location. Utilizing the right restorative materials and clinical techniques are the keys to this. For back-to-back Class II composite restorations, a successful restorative workflow is a combination of streamlined sequencing and maximizing the potential of your instrumentation and materials to ensure excellent restorative results.
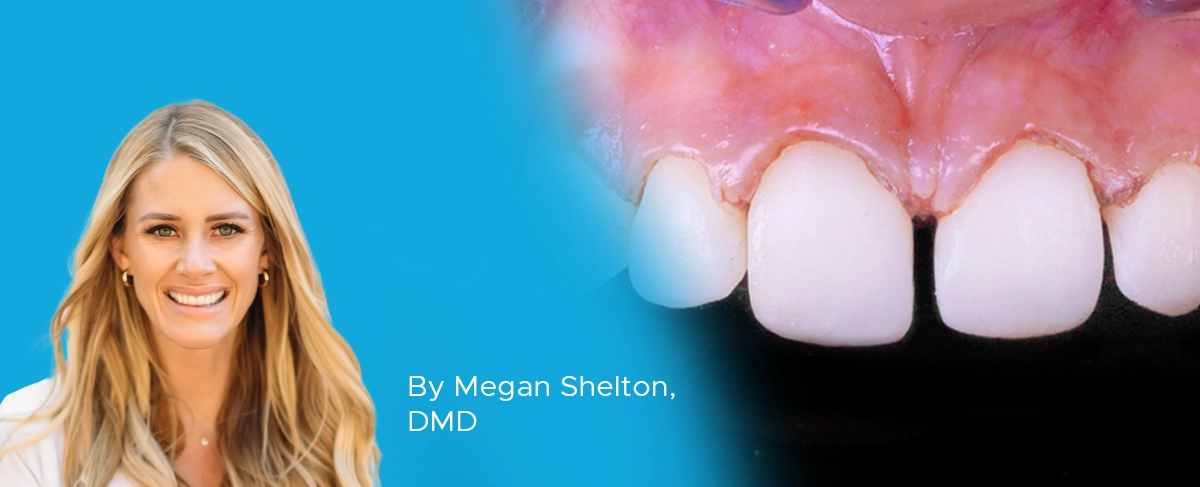
The following case shows a common clinical scenario. A patient presented with a food trap between two upper posterior teeth. Flossing in this area was difficult due to the floss shredding on the sharp edges of the restorations present on both teeth in the food trap. This had been present in the mouth for several years. (FIG. 1)
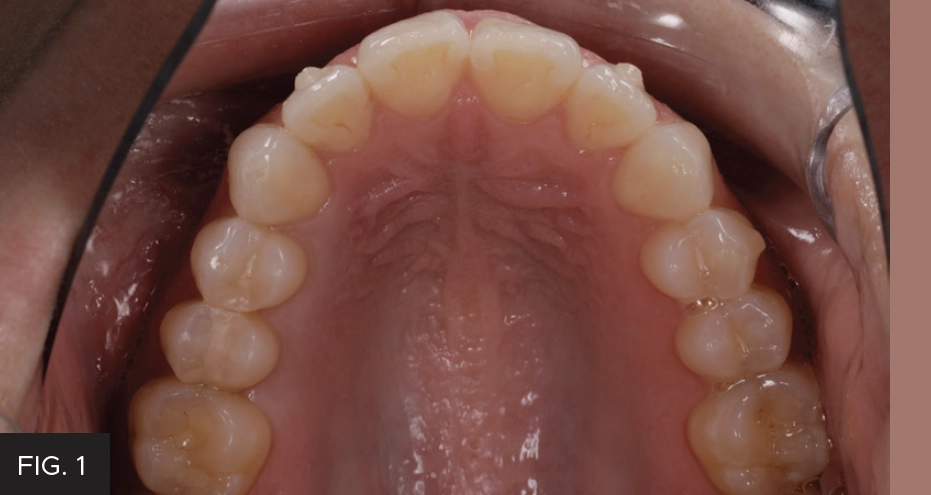
Pre-op: patient presented with a chief complaint of a food trap between long-standing composite restorations on teeth #12 and #13. Decay on the mesial of #13 was detected radiographically.
Clinically, teeth #s 12 and 13 displayed long, thin, flat, poorly contoured marginal ridges on the mesial of #13 and distal of #12, along with a small chip on the distal marginal ridge of #13. Radiographically, caries were detected on the gingival margins of the distal of #12 and the mesial of #13, respectively. These findings support the chief complaints of both food entrapment and difficulty in accessing interproximal for flossing. Robust, rounded marginal ridges, contoured from buccal to lingual, and from mesial to distal provide a strong surface to keep food cycling through the masticatory process and protect the integrity of the contact. Additionally, this smooth rounded marginal ridge helps the dental floss easily access the interproximal area. With this in mind, the treatment plan involved the removal and replacement of new Class II restorations on teeth #12 and #13 with improved, natural contours and contacts that would resist trapping food and be more amenable to the patient’s oral hygiene care. The patient had a low dental anxiety index and, given the age of the restorations and the frustration with consistently trapping food and breaking floss, readily agreed to treatment.
Once the patient was anesthetized with infiltration, a True™ Dental Dam (Clinician’s Choice®) was placed over the quadrant. Rubber dams provide superior isolation for tissue retraction and the prevention of fluid contamination; as well as for the comfort and safety of the patient. It also provides a wide retracted view for the assistant to improve the efficiency of four-handed dentistry. Latex-free True Dental Dam is fast and easy to apply and tear-resistant when placed over the clamp and teeth.
The previously placed composite restorations were removed using a high-speed handpiece with a pear-shaped cylindrical diamond bur. I prefer a diamond over a carbide bur for this purpose due to its efficient removal of the old composite, especially with the consistent torque of the electric motor. This exposed the caries on the gingival margins of #12 and #13 that was then removed using a round carbide bur at a low speed. (FIG. 2)
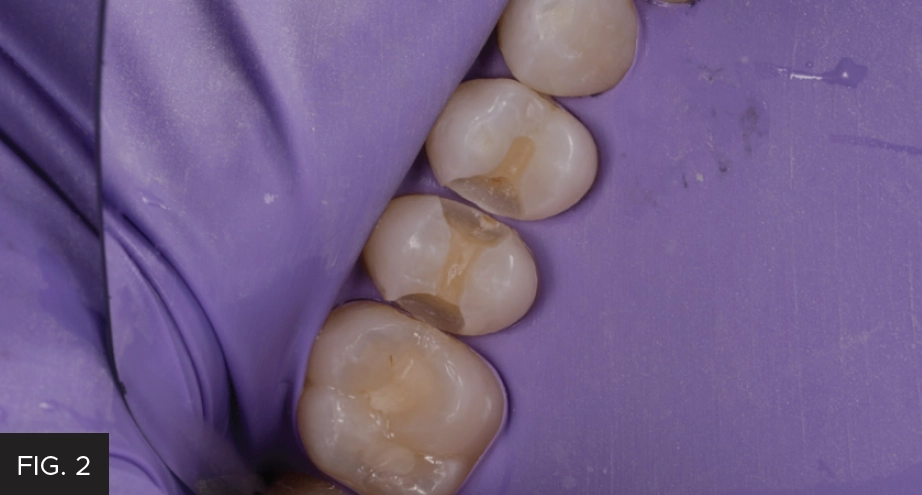
The existing composite restorations were removed and clinically revealed the decay on the mesial of tooth #13. Once the decay was removed, the preparations were refined internally, and the occlusal margins were beveled.
The preparation was then refined by rounding all internal line angles for better composite adaptation, followed by the beveling of the occlusal margin. A beveled occlusal margin has been shown to improve the adaptation of the composite to the tooth as well as decreasing the risk of micro-leakage. Each preparation was then air abraded with 50-micron aluminum oxide particles using a PrepStartTM (Zest Dental Solutions®) to help remove the smear layers, create ideal microanatomy for bonding, and remove the debris left behind from instrumentation.
Whether restoring an entire quadrant, or just two teeth, I prefer to start with the most distal prepared tooth. DualForce™ Ultra-Wrap™ Matrix Bands (Clinician’s Choice) were placed on the mesial and distal of #13. The DualForce Ultra-Wrap Matrix Bands are resistant to crimping so are suitable for Class II’s with narrow proximal boxes, especially on narrow teeth such as premolars. Alternatively, these sectional matrix bands wrap well around the buccal and lingual surfaces, enough so that they can accommodate up to one missing cusp. The DualForce Ultra-Wrap Matrix Bands are pre-contoured both at the contact proximal contact area and marginal ridge. When the appropriate size is used, there is virtually no finishing of the marginal ridge and the proximal contact is in its optimal location.
A DualForce™ Active-Wedge™ (Clinician’s Choice) was placed on the mesial and distal of #13. They have a collapsible leading point that re-expands once it passes under the contact, effectively locking it in place and sealing off the gingival margin of the proximal box. The DualForce Active-Wedge’s unique anatomical design allows for a more complete seal of the matrix band to the tooth than a wooden wedge as well as produces a consistent separation force of 2 lbs., an improvement over the wooden wedge that is prone to “backing out”.
Using the DualForce™ Ring Forceps, two DualForce™ Rings (Clinician’s Choice) are placed on the mesial and distal aspects of #13 in a “butterfly” pattern such that they face away from each other. (FIG. 3)

Components of the DualForce Matrix System, consisting of two DualForce Ultra-Wrap Matrix Bands, two DualForce Active- Wedges and two DualForce Rings, were placed on the mesial and distal of tooth #13. The combined effect of strong separation forces and pre-contoured matrix bands is the creation of tight, natural proximal contacts in the restoration.
These rings provide a large separation force, in addition to that from the DualForce Active-Wedges. It is this combined separation force that ensures strong proximal contacts in the final restoration. The contoured plastic prongs stabilize the DualForce Rings help seal the DualForce Ultra-Wrap Matrix Band vertically to the tooth, reducing the amount of buccal and lingual flash to be removed later.
I prefer to use the selective-etch technique when placing posterior composite restorations. The key to this is to have a very small gauge tip and high viscosity etch to limit the 35% phosphoric acid to the enamel and avoid any creeping onto the dentin. Once rinsed and dried, the adhesive (All-Bond Universal®, Bisco) was placed on the enamel and dentin in a single layer, scrubbed for 20 seconds then air-thinned for 5-7 seconds to drive off the solvent. This adhesive was then light-cured for 20 seconds with a broad-spectrum wavelength curing light (Bluephase®, Ivoclar).
Due to its ideal handling properties, polishability, and strength, Evanesce™ shade A3 (Clinician’s Choice) was chosen, in its optional universal opacity, and carried to the preparation using a Compo-Ject™ (Clinician’s Choice) composite gun. The Compo-Ject is a balanced stainless-steel gun that provides straight-line visualization and accuracy when placing small increments of composite. The proximal boxes were restored first, using 2 mm increments, leaving the occlusal portion for last. (FIG. 4)
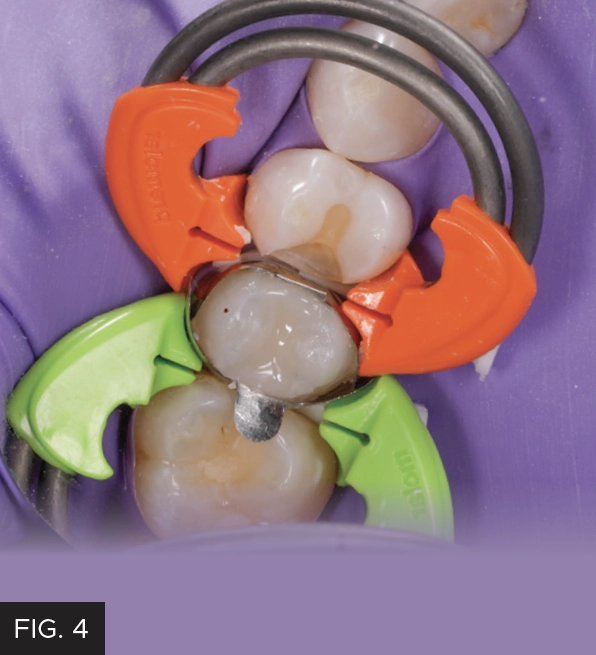
Evanesce A3U was placed incrementally, starting with the proximal boxes and progressing to its full occlusal contour. Due to the pre-contoured marginal ridge of the DualForce Ultra-Wrap Matrix Bands and their vertical seal against the tooth by the DualForce Rings, there was very little finishing required prior to final polishing.
The OptraSculpt® Next Generation (Ivoclar) composite instrument with the ball modeling attachment works very well with Evanesce, providing good adaptation to the preparation. The OptraSculpt composite instrument with the purple point tip was used to quickly create the occlusal anatomy. Each 2 mm increment placed was light-cured for 20 seconds.
At this point, the DualForce™ Sectional Matrix System components were removed from tooth #13. The DualForce Rings had sealed the DualForce Ultra-Wrap Matrix Band to the tooth, thus avoiding any formation of flash. When there is a flash detected once the matrix band is removed, a #12 scalpel is useful for its removal. I will then confirm the smoothness of the axial walls with dental floss and an explorer. The marginal ridges and contours of the restoration were visually inspected and determined to be ideal and we were ready to continue with the restoration of tooth #12. This step is critical as the restoration on #12 will be “built” to this marginal ridge and proximal contours of #13. If any modifications to the proximal contours are necessary, a combination of a flame-shaped diamond and discs may be used to correct any discrepancies before advancing to the next restoration.
A DualForce Ultra-Wrap Matrix Band was placed on the distal of the tooth #12, followed by a DualForce Active-Wedge to seal off the gingival margin and start the process of separation of the teeth. The DualForce Ring was placed on the distal of #12, facing away from the preparation to provide the most visibility for composite placement. The enamel was etched using 35% phosphoric acid, rinsed, and dried. Once the adhesive had been placed, scrubbed, air thinned, and light-cured, Evanesce was placed incrementally, sculpted, and light-cured as it was with the previous restoration. Once again, the DualForce Ring, Active-Wedge, and Matrix Band were removed post-curing.
Finishing of the restorations on teeth #12 and #13 was limited to the use of a flame-shaped diamond to refine the occlusal margin and tertiary anatomy. Polishing of the Class II composites took less than a minute using the A.S.A.P.® Dailies (Clinician’s Choice) 2-step diamond polishing system. (FIG. 5)
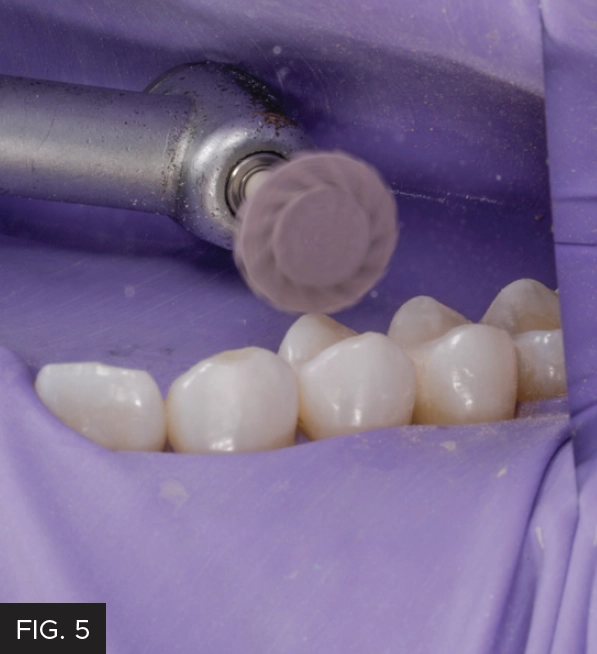
A.S.A.P. Dailies 2-step diamond polishing system was used to obtain a fast, high luster to the final restorations. The purple Pre-polisher and the peach Final High Shine Polisher require less than one minute combined to be highly effective and can be autoclaved and re-used 3-4 times prior to discarding.
The purple Pre-polisher and peach Final High Shine Polisher were used at 10,000 rpm for approximately 15 seconds per composite surface. The Pre-polisher required medium pressure in a wiping motion followed by the Final High Shine Polisher with slightly less pressure with the same motion. The rubber dam was removed, the occlusion was verified, and the proximal contacts were evaluated with floss for tightness and smoothness. (FIG. 6)
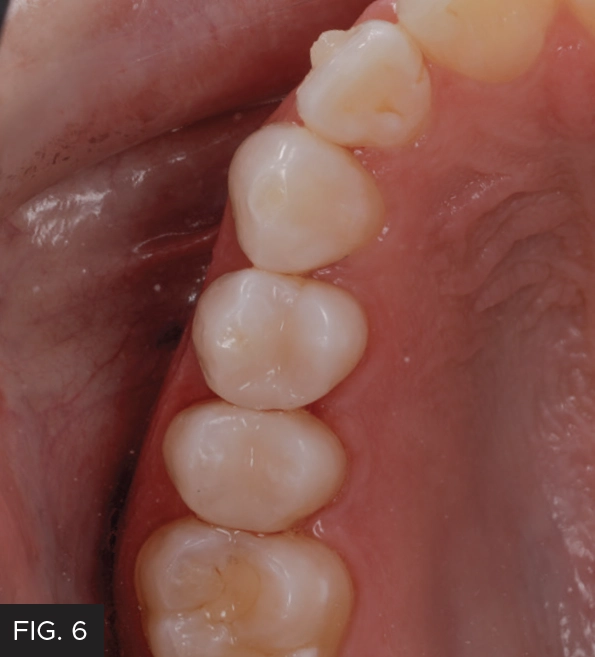
Post-op: An excellent clinical result obtained through an efficient, streamlined workflow by combining proven restorative techniques with state-of-the-art instrumentation and dental materials. The patient greatly appreciated the elimination of the open contact, that created such an annoying challenge to their oral care.
As commonly as it occurs, the restoration of multiple Class II composites in a single appointment can present unique challenges. Re-establishing natural proximal surface contours and tight, well-positioned contacts are critical to the success of the restorations. This can be achieved by establishing a workflow blending a logical restorative sequence combined with the use of instrumentation and materials designed to reproduce strong posterior interproximal contact areas.

ABOUT THE AUTHOR
Dr. Megan Shelton is a restorative and cosmetic dentist in Southern California. Dr. Shelton attended the University of Louisville School of Dentistry. She is a graduate and mentor of the Kois Center, which has given her the knowledge to predictably treat patients with complex problems. She is known as a leader in the industry for her implementation of digital dentistry, restorative materials, and continuing education into her private practice and now owns a consulting firm, Shelton Solutions, to coach other dentists to become confident practice owners.
Share This Article! Choose Your Platform
Products Mentioned in this article


Related Articles
Achieving Clinical Success Utilizing the DualForce™ Sectional Matrix System
By Susan Prater-Kudlats, DMD
Although Class II restorations are routine amongst restorative dentists, they still present challenges when it comes to proper contour isolation, and marginal seal. Failure to achieve adequate contour can lead to food packing, gingival inflammation, and bone loss over time. The inability to ensure isolation can result in post-operative sensitivity; the marginal seal is essential to prevent recurrent decay.
Multilayer Composite Technique for Extraordinary Outcomes in Common Clinical Situations
By Megan Shelton, DMD
Responsible esthetic dentistry embraces the notion of optimizing esthetic results with minimal tooth structure removal while acknowledging the inherent risk to the dentition as a result of any restorative intervention. It is this systemic approach that underlies my esthetic treatment planning and, more often than not, multilayered composite allows me to provide the highest quality esthetic dentistry with the least impact to tooth structure.
Using Injection Molding Composite Veneers as a Transitional Guide During Orthodontic Treatment
By Megan Shelton, DMD
It is not uncommon for adolescents to exhibit spacing in the anterior dentition and this can often be the motivating factor in seeking orthodontic treatment. Microdontia, the term used to describe teeth that are smaller than normal, is frequently responsible for this spacing and can lead to a Bolton discrepancy when present in one arch relative to the opposing arch.