
Using Injection Molding Composite Veneers as a Transitional Guide During Orthodontic Treatment
It is not uncommon for adolescents to exhibit spacing in the anterior dentition and this can often be the motivating factor in seeking orthodontic treatment. Microdontia, the term used to describe teeth that are smaller than normal, is frequently responsible for this spacing and can lead to a Bolton discrepancy when present in one arch relative to the opposing arch.
When it comes to the management and treatment of microdontia, we must consider the risk associated with each treatment option and the patient’s expectations for the esthetic result. Clinical examination of the patient includes a medical history, examination of the hard and soft tissues, the patient’s chief concern, TMJ analysis, occlusal assessment, and a full set of diagnostic photographs. Photos should include a full-face smile, a repose smile, non-retracted smiles from multiple views, retracted views, and occlusal views using high resolution photography. For a more comprehensive analysis, I recommend mounted diagnostic models using a digital or facebow transfer.
Evaluation of the photographs to evaluate how the microdontia impacts the patient’s clinical presentation and correlating the models is critical. Consideration should be given to how much of the patients teeth show, the angulation of the teeth, tooth position, shade, as well as patient expectations. If the microdontia teeth are treated without orthodontia, the outcome may be acceptable, but not ideal. If an interdisciplinary approach with an orthodontist is to be considered, it is imperative for the general dentist to carefully communicate where to properly position the disproportionate teeth.
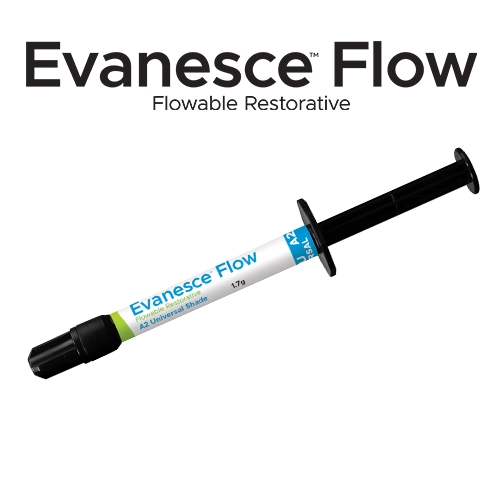
The evolution in composite resins has included ongoing changes in particle size and shape, handling properties, and pigments and fillers to try to maximize the esthetic properties; while complimenting the physical properties to allow for functional success. Evanesce Flow (Clinician’s Choice), has filler characteristics that allow it to “disappear” into the tooth structure for optimal esthetics. Its unique thixotropic properties allow for improved control, ease of dispersion, and minimizes slumping on vertical surfaces. The shade and opacity match to the VITA Classic shade guide has made Evanesce Flow a viable option for use anywhere in the mouth, as well as distinguishable on a radiograph for ease of diagnosis. Esthetic and strong, easy to express and manipulate, available in the most popular shades and opacities, Evanesce Flow is the ideal solution to minimally invasive restorations and a vital component to your large composite cases.
CLINICAL CASE
In this case, the patient presented with the complaint of “my teeth are small and I need braces.” The medical history was non-contributory. Comprehensive exam and diagnostic records were taken. It was noted that the patient had maxillary spacing, narrow maxillary anterior teeth, a deep bite, with no caries or periodontal disease present. (FIG. 1)
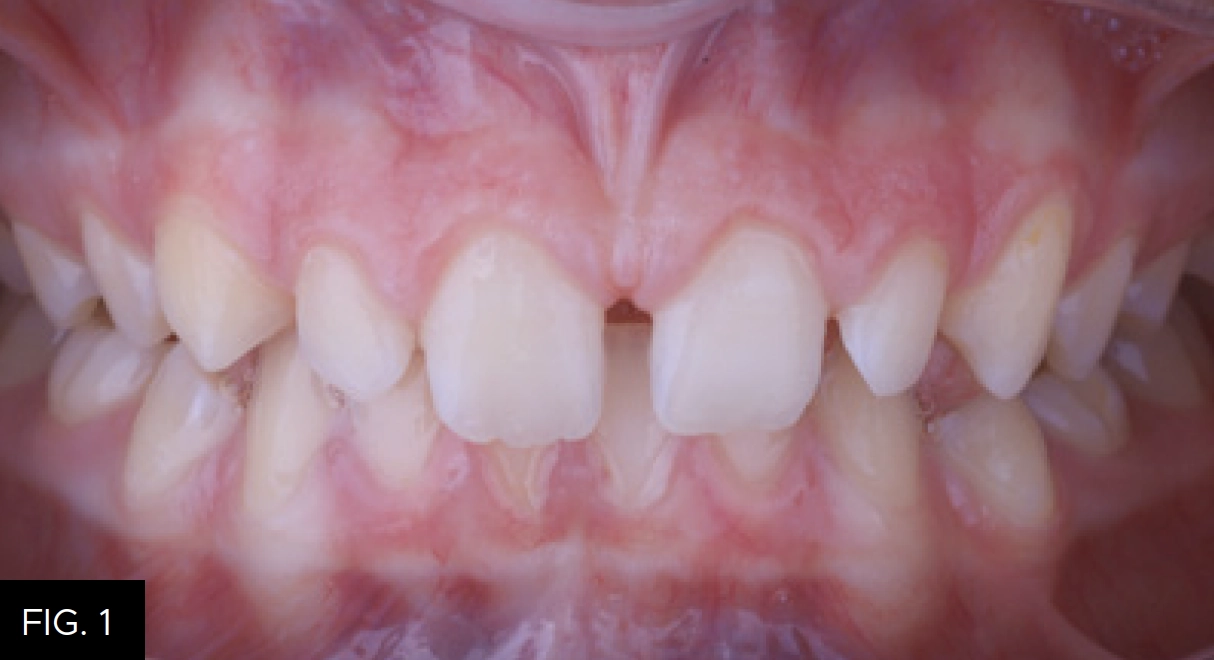
Patient presented with maxillary anterior microdontia and spacing with a deep bite.
Treatment options discussed with the patient and guardian included orthodontics, Invisalign, followed by restorative options using indirect bonded porcelain restorations or direct resin bonded restorations. The risks and benefits were discussed at length and the patient elected to improve tooth size and position.
The first step was creating a diagnostic wax up with a BlueSky Bio Plan to allow for visualization of the result. (FIG. 2)
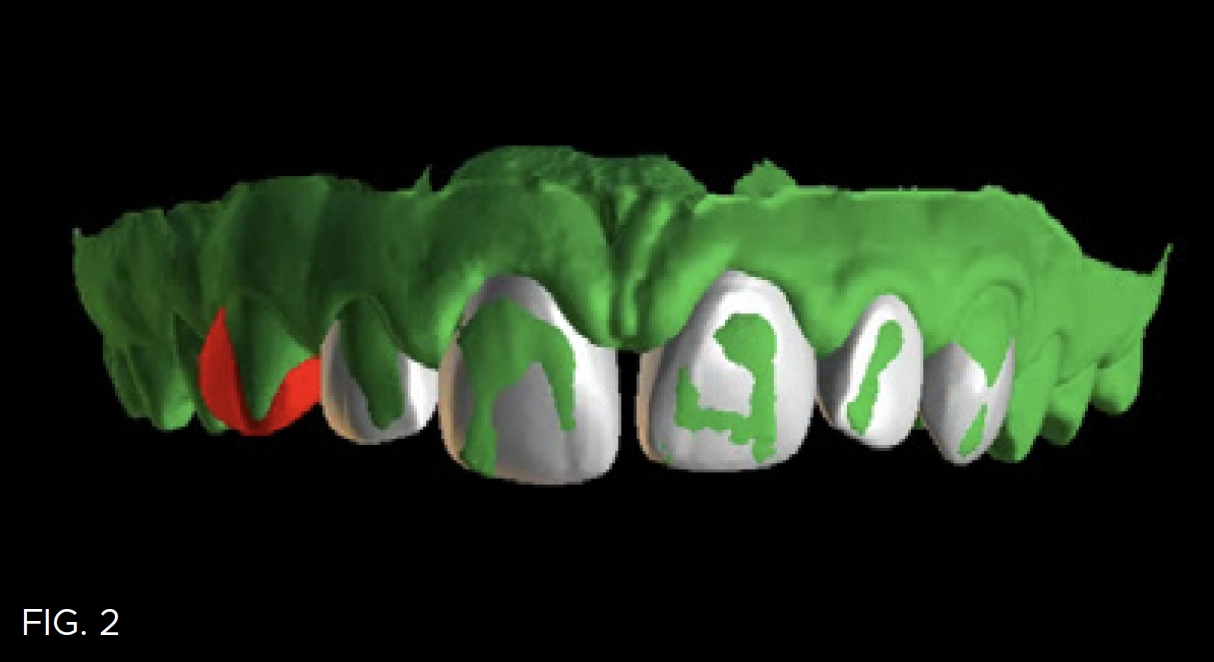
Diagnostic wax-up using a BlueSky Bio Plan.
The wax-up was created keeping the axial angles of the teeth the same as they are at the time the patient presents. The purpose of the digitally designed wax-up is simply to improve the tooth size to allow for better orthodontic treatment and visualization of the teeth during alignment, not for esthetic smile design. Two STL files were created; the first with the even numbered teeth waxed up (#s 6, 8, 10) and the second with all teeth waxed up (#s 6 – 11). The STL files were transferred and printed utilizing Einstein (Desktop Health) using Model Z resin; the total print time was 34 minutes. (FIG. 3) It is notable that a conventional wax-up design could be used but would have required extra lab time and added expense, while not facilitating the use of multiple models for multiple matrices.
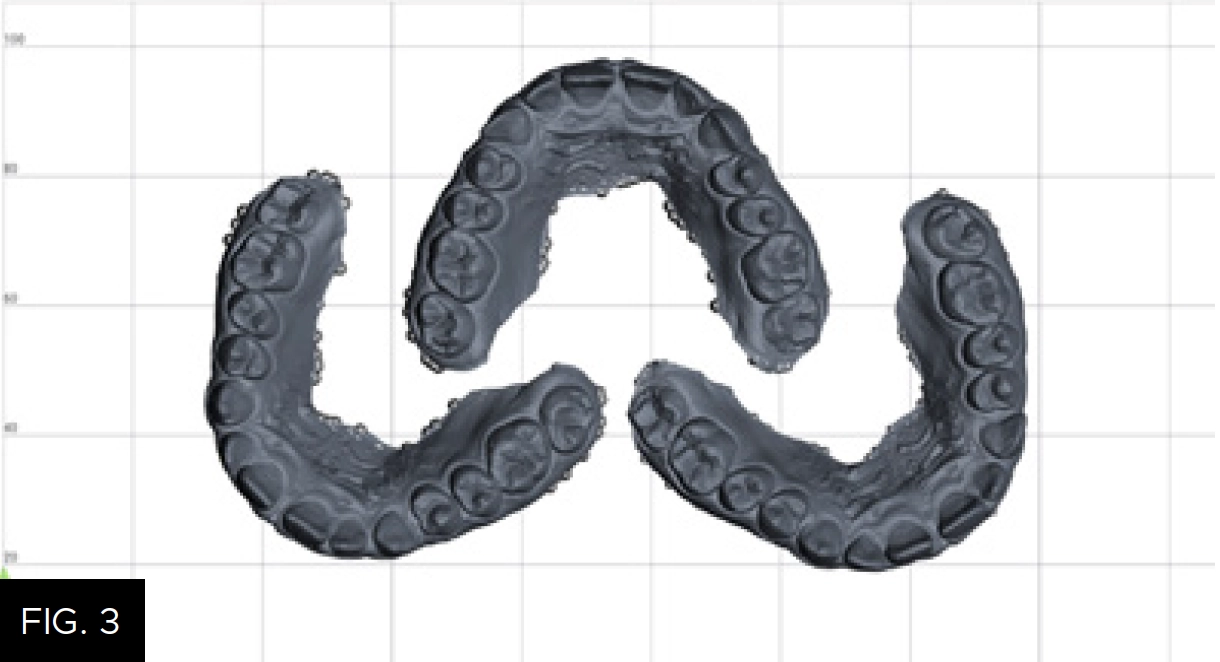
Transfer of STL files for printing of wax-up models.
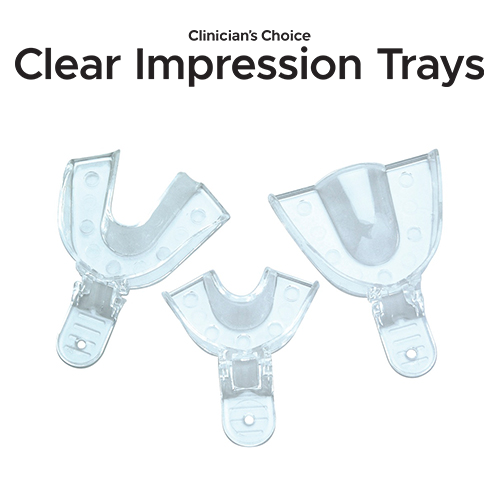
Transfer of the digital design to the mouth is accomplished utilizing two clear matrix stents. I call them “even” and “odd” based on the teeth numbers that will be injected. Clear, non-perforated trays (Clinician’s Choice) are ideal for the fabrication of the matrix for better adaptation of the impression material to the wax up. The tray comes in an anterior segment or a full arch size; choice of size is dependent on the number of teeth you are treating. For this case an anterior tray was sufficient. A clear matrix impression material, such as Affinity Crystal Clear Matrix Impression Material (Clinician’s Choice) for example, is excellent for this matrix, it is an advanced silicone matrix material that has ideal working times, and its transparency facilitates the proper seating of the impression tray. I suggest that you practice seating the tray on the resin models on a flat surface prior to taking the actual impression. It is important to center the teeth facio-lingually in order to have optimal matrix thickness for proper rigidity during the intraoral application. To help avoid bubbles on the gingival-facial aspect of the matrix, extrude some material directly onto the model at the gingival margin and then load the tray and seat the filled tray on the model leaving 3mm incisally and 3mm facially between the tray and the models. (FIG. 4)
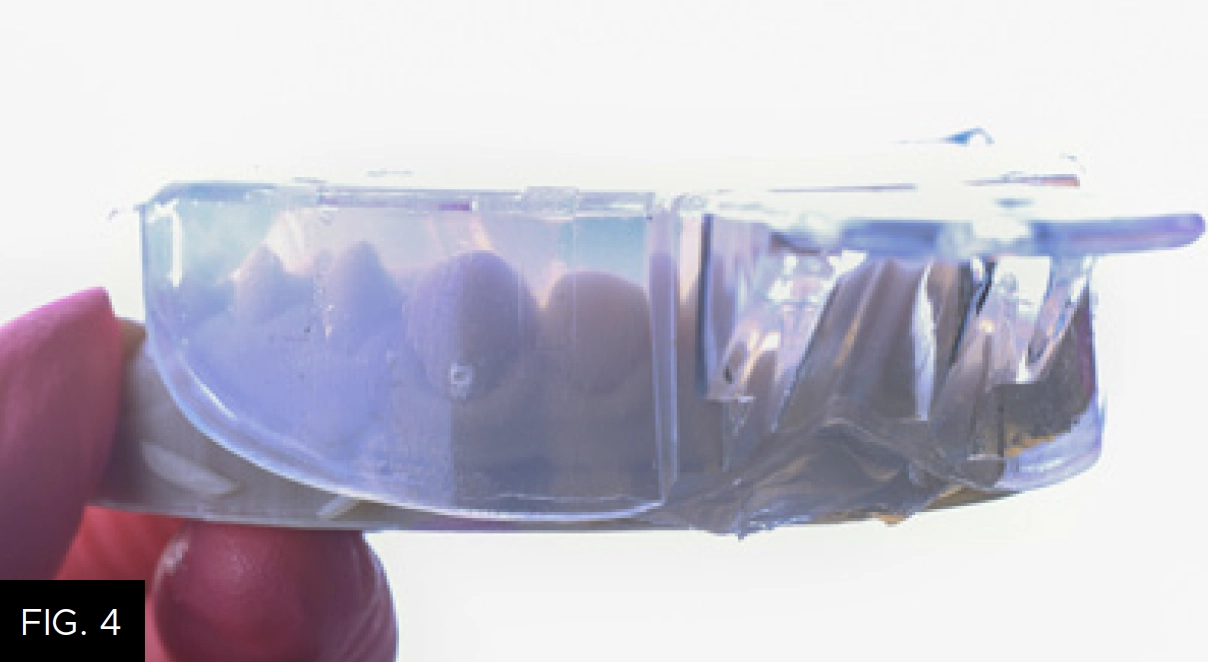
Affinity Crystal Clear Matrix Impression Material in a clear impression tray is centered over the wax-up model with 3mm incisal and facial clearance.
You will repeat this step twice, once on model “even” and again on model “odd.” The “even” matrix is then prepared for injection using the mixing tip that is placed on the Evanesce Flow (Clinician’s Choice) syringe from the inside of the matrix puncturing towards the outside. (FIG. 5) Clear the impression material from the syringe tip, confirm the tip can enter passively from both the antaglio surface and the external side for ease of injection of the resin. Repeat this step with the “odd” matrix, puncturing only the odd numbered teeth.
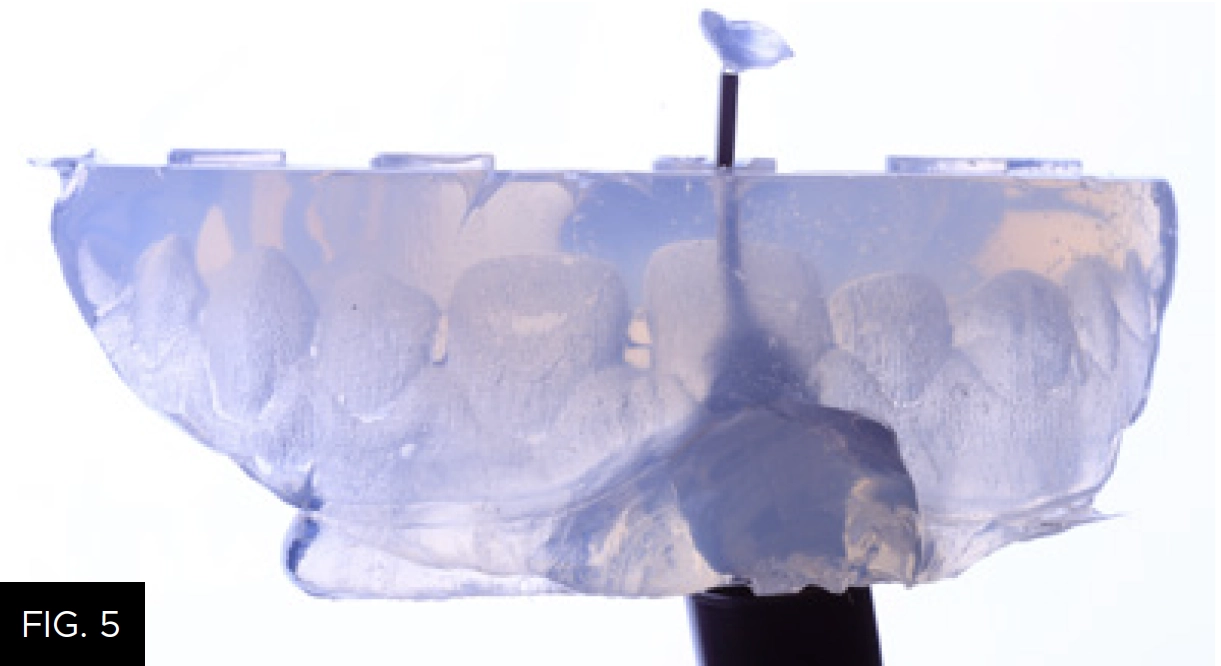
The mixing tip from a loaded Evanesce Flow syringe is used to puncture the impression in an inside to outside direction directly over the tooth to be restored.
Shade selection was achieved using the VITA shade guide and confirmed by direct application of the composite to tooth #9 with shade A1U Evanesce (Clinician’s Choice). A single shade was chosen as this composite has an 85% Universal opacity, which makes it a great choice for mimicking natural dentition.
An Optragate (Ivoclar) was placed to retract the lips and cheeks. Retraction cord was placed to retract gingival tissues. A rubber dam was not used in this case as it would prevent proper seating of the matrix in this circumstance; however, each situation will vary.
Surface preparation for Injection Mold Composite Veneers utilizes a conservative technique. Air-abrasion was performed using the Danville PrepStart with 27-micron Aluminum Oxide powder. Since enamel was the substrate we were bonding to, a total etch 35% phosphoric acid Max Etch (Clinician’s Choice) was used. PTFE tape was placed over the teeth that would not be bonded on the first round of injection molding with the “even” matrix. The PTFE tape was trimmed, leaving it long enough to cover the tooth, and a composite instrument was used to help adapt the matrix to the teeth. (FIG. 6) After, a single application of MPa Max (Clinician’s Choice), a 5th generation bonding agent, was placed on the tooth, air dried and thinned with an Adec warm air dryer and light cured to ensure high bond strength.
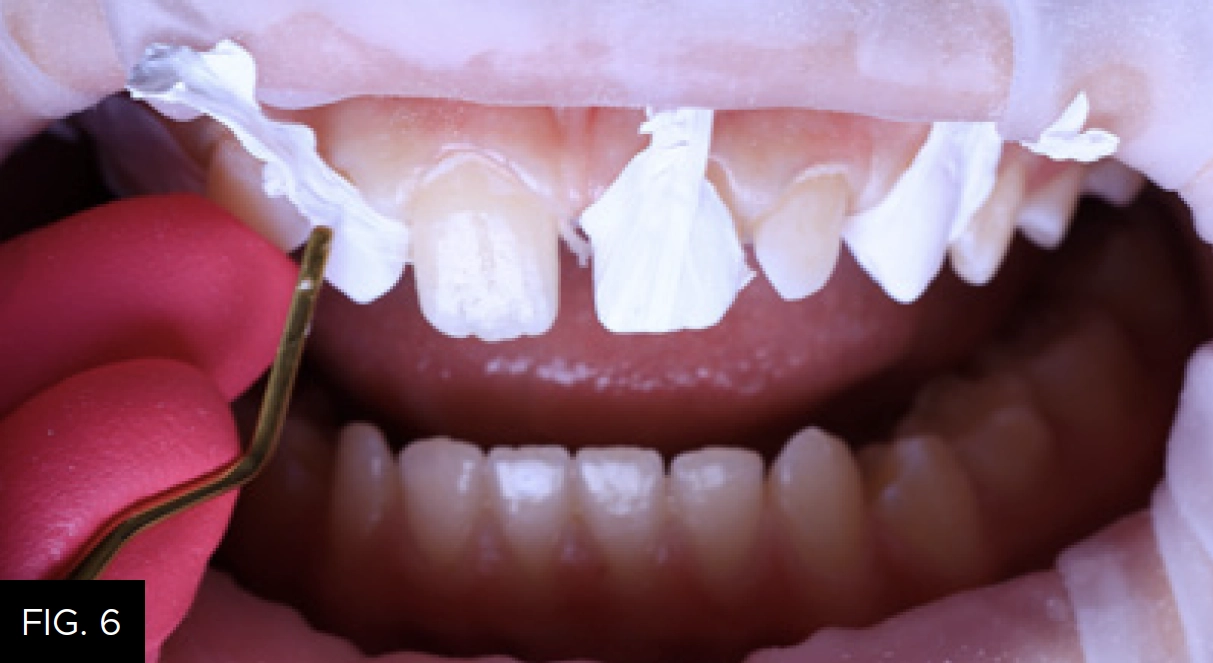
PTFE tape is applied to teeth not to be bonded to.
The first Crystal silicone matrix (“even”) was placed into the mouth. Proper seating was confirmed visually by ensuring that it seated fully on the PTFE covered teeth and felt for full seating on the palate and posterior teeth.
A new tip was placed on the Evanesce Flow (Clinician’s Choice) syringe and inserted into the access holes. The challenge with injection molding is the potential for flash formation. To help control flash, firm vertical pressure was applied to the matrix along with horizontal finger pressure to the tooth being added to, creating a seal to minimize flash. Evanesce Flow was injected until the material reached the apical extent and filled the incisal extent, then light cured for 20 seconds. (FIG. 7)
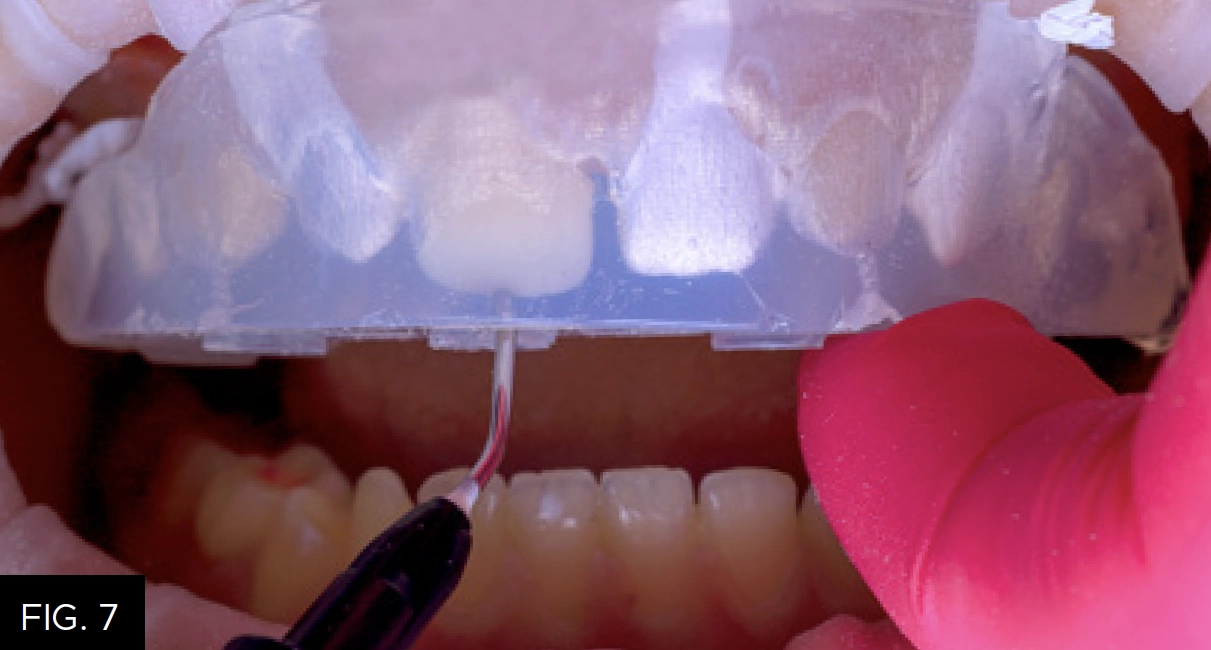
A new tip on the syringe is inserted into the access hole and Evanesce Flow is injected until the space between the apical and incisal extent is filled. Light cure through the clear impression.
Affinity Crystal (Clinician’s Choice) impression material makes curing through the matrix simple and effective; however, it is recommended to repeat the light curing step once the matrix is removed to ensure complete polymerization. With the shape established from the matrix, it becomes simple to visualize the flash and where cleanup and polishing is required. Excess flash was removed using a high speed carbide bur and a 12a scalpel blade. Interproximal surfaces were smoothed and refined using perforated diamond strips and Contours Finishing and Polishing Discs (Clinician’s Choice). (FIG. 8)
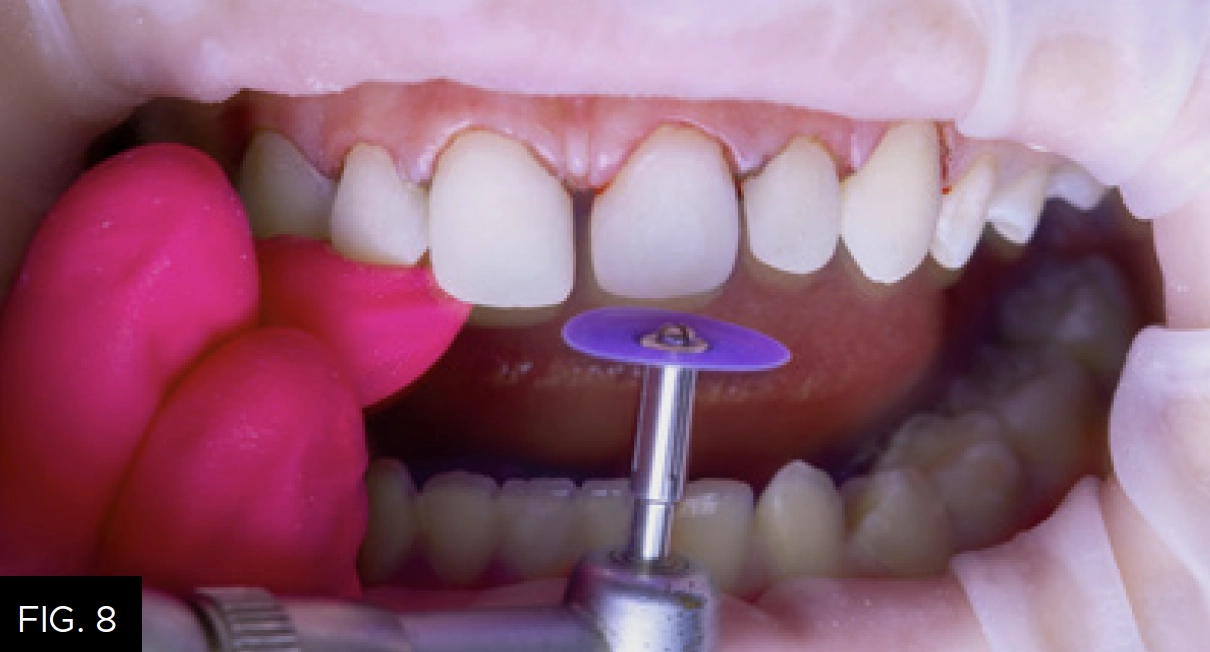
Interproximal surfaces are smoothed and refined using Contours Finishing and Polishing Discs and/or perforated diamond strips.
The steps were repeated for the second Crystal matrix (“odd”). Following the surface preparation process, the previously injected teeth were covered with PTFE, bond was applied, air dried and light cured, and Evanesce Flow was injected over the other teeth. The process to remove flash was then repeated.
The retraction cord was removed and final polishing was done efficiently using the two step A.S.A.P. Dailies All Surface Access Diamond Polishers (Clinician’s Choice). The purple pre-polisher was applied first at 10-12,000 rpm to smooth the surface (FIG. 9), followed by the peach High Shine Polisher to create the ideal luster.
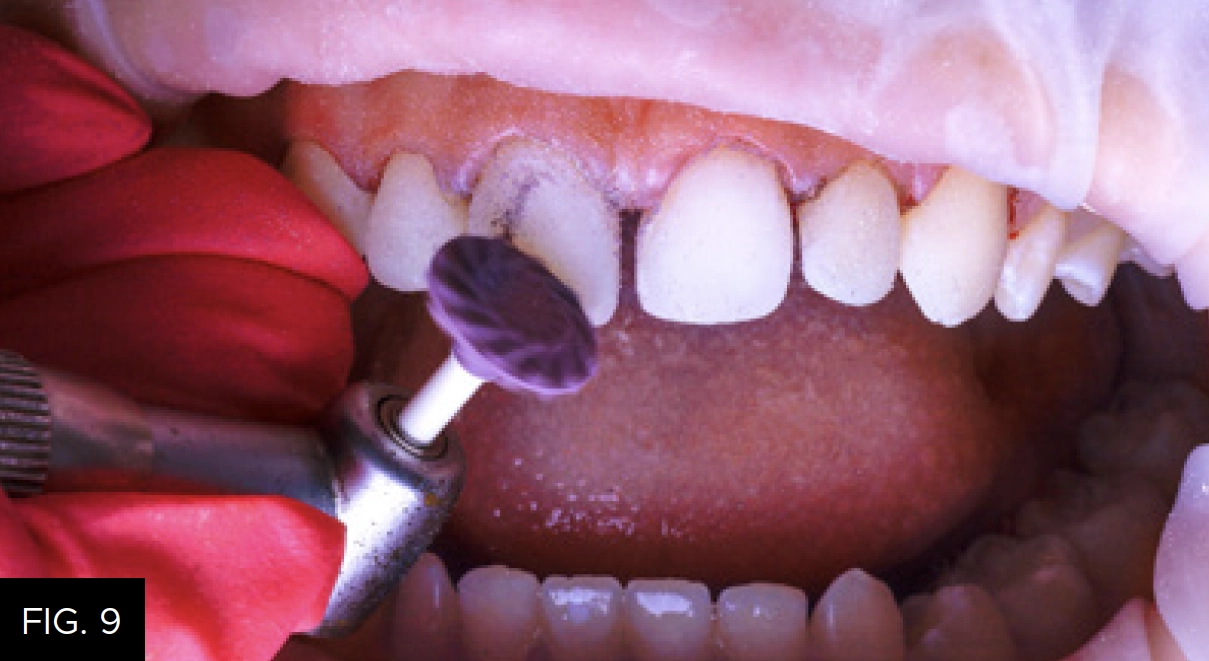
The purple A.S.A.P. Pre-polisher is used for 15 to 20 seconds at 10-12,000 RPM to remove surface scratches. The peach A.S.A.P. Final High Shine polisher follows, using the same speed and time to create a high luster.
The patient returned two weeks later after re-hydration of the teeth for final polishing and oral hygiene instruction. The patient will begin orthodontic therapy with traditional brackets and wires to improve the overjet and overbite. As orthodontic treatment progress, the tooth size and shape can be modified and improved as needed to achieve a functional and esthetic outcome. Using this additive approach allows for changes throughout the orthodontic treatment without introducing any risk to the patient’s natural dentition as no tooth preparation was performed.
Final restorative plans will not be made until the final stage of orthodontic treatment and peak of growth maturation. The initial changes to the tooth morphology will facilitate tooth placement and allow brackets to be bonded, which is a challenge for orthodontists when porcelain is present.
Using Evanesce Flow for the Injection Mold Composite Veneer technique is both predictable and efficient. This method is excellent for final restorations, long-term provisional restorations, teens in orthodontics, and for patients with financial restrictions. (FIG. 10 and 11)
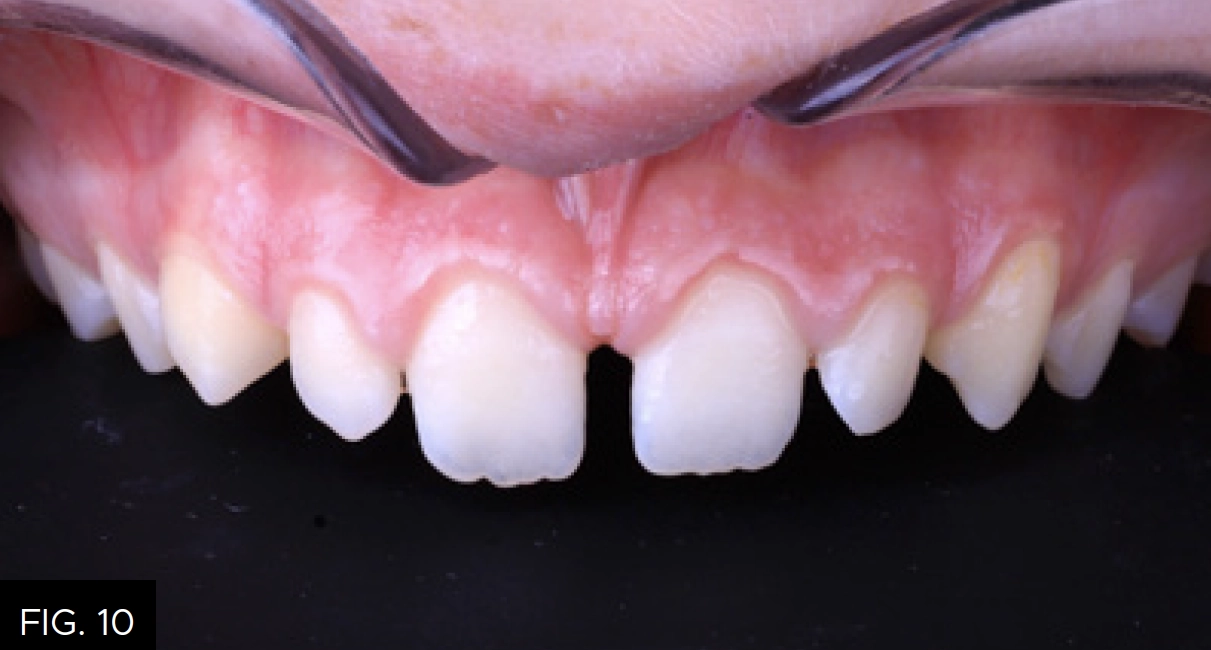
Retracted pre-treatment photo.
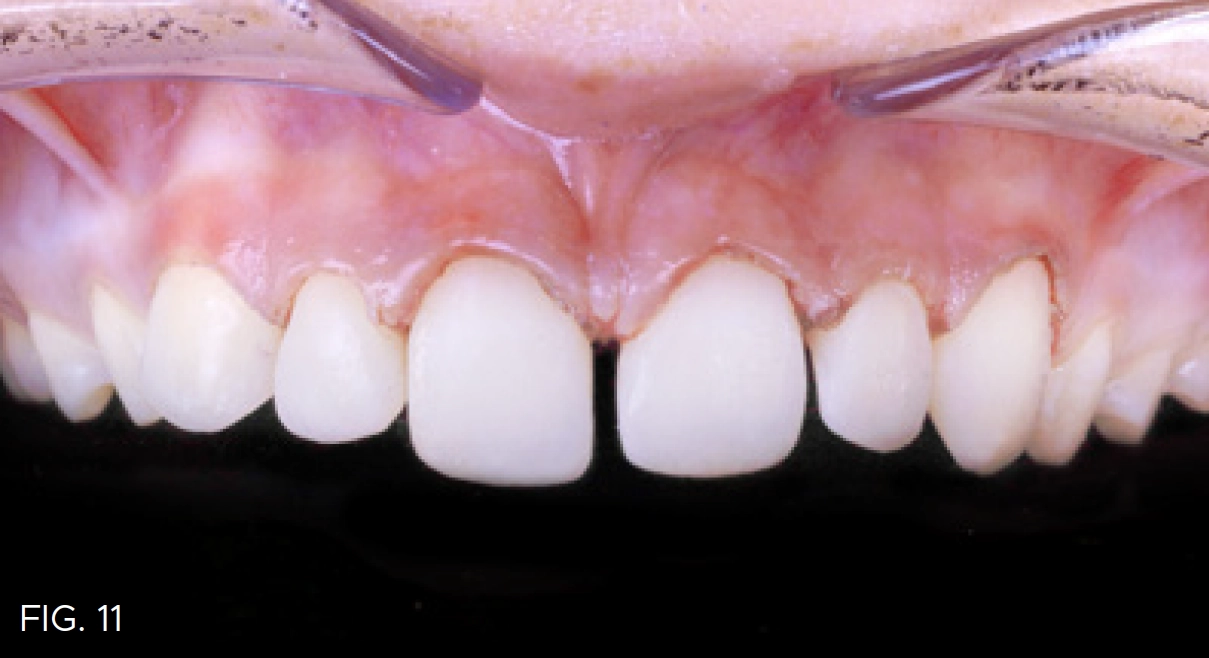
Retracted post-restorative photo showing four
maxillary incisal teeth restored to normal size
and shape. These will help guide the orthodontic
treatment for optimal tooth placement and alignment.

ABOUT THE AUTHOR
Dr. Megan Shelton is a restorative and cosmetic dentist in Southern California. Dr. Shelton attended the University of Louisville School of Dentistry. She continued her education at the Kois Center and graduated in 2021, which allows her to predictably treat patients with complex problems. She is known as a leader in the industry for her implementation of digital dentistry, restorative materials, and continuing education into her private practice and is now helping other dentists to do the same.
Share This Article! Choose Your Platform
Products Mentioned in this article
Related Articles

Simple, Beautiful, and Predictable Class V Restorations
By Marc Geissberger, DDS, MA, BS, CPT
In general, people are retaining their teeth much longer than decades past. With this increase of tooth retention, the need to maintain and protect teeth has never been greater. Non-carious Class V lesions have become commonplace.
The Back-to-Back Class II Composite: A Predictable Workflow for One of the Most Common Clinical Procedures
By Megan Shelton, DMD
While it may be one of the most common procedures in most restorative dental offices, the efficient placement of multiple Class II composites in a single quadrant can be technically demanding. Creating strong and natural proximal contours and contacts with the restoration of even a single Class II composite restoration can pose a challenge using traditional matrix systems.
Using Affinity Crystal and Evanesce Flow in an Injection Molding Technique
By Susan Prater-Kudlats, DMD
The injection molding technique is gaining popularity for dental clinicians due to its wide array of procedural applications. This technique involves injecting a low viscosity resin composite through a transparent silicone index made from a diagnostic wax-up, aiming to replicate the mock-up.