
Achieving Clinical Success Utilizing the DualForce™ Sectional Matrix System
By Susan Prater-Kudlats, DMD
Although Class II restorations are routine amongst restorative dentists, they still present challenges when it comes to proper contour, isolation, and marginal seal. Failure to achieve adequate contour can lead to food packing, gingival inflammation, and bone loss over time. The inability to ensure isolation can result in post-operative sensitivity; the marginal seal is essential to prevent recurrent decay. Finding practical solutions to reduce or eliminate these challenges is crucial to delivering a comfortable and long-lasting restorative outcome.
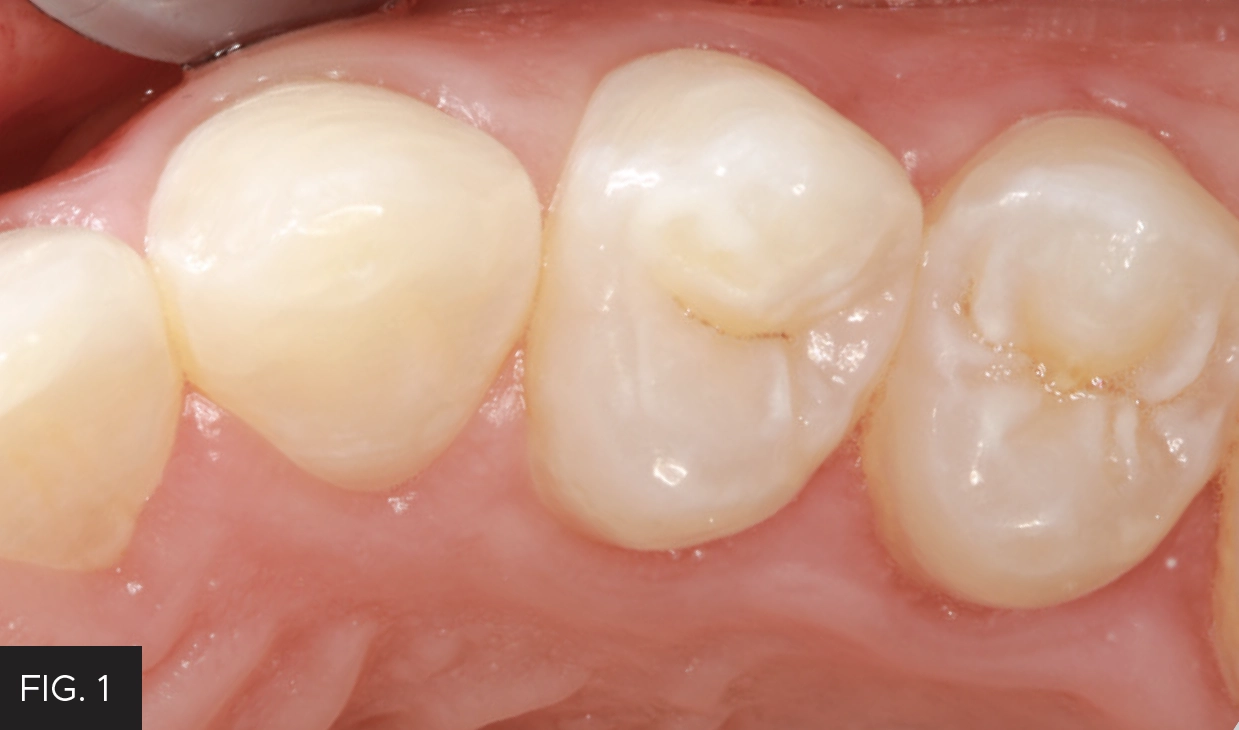
Pre-op.
This clinical case highlights a common scenario. (FIG. 1) A Class II carious lesion was detected on the distal of #5. (FIG. 2) The patient was anesthetized via infiltration. Before preparation, a latex free rubber dam (True™ Dental Dam, Clinician’s Choice®) was placed to provide the first line of isolation.
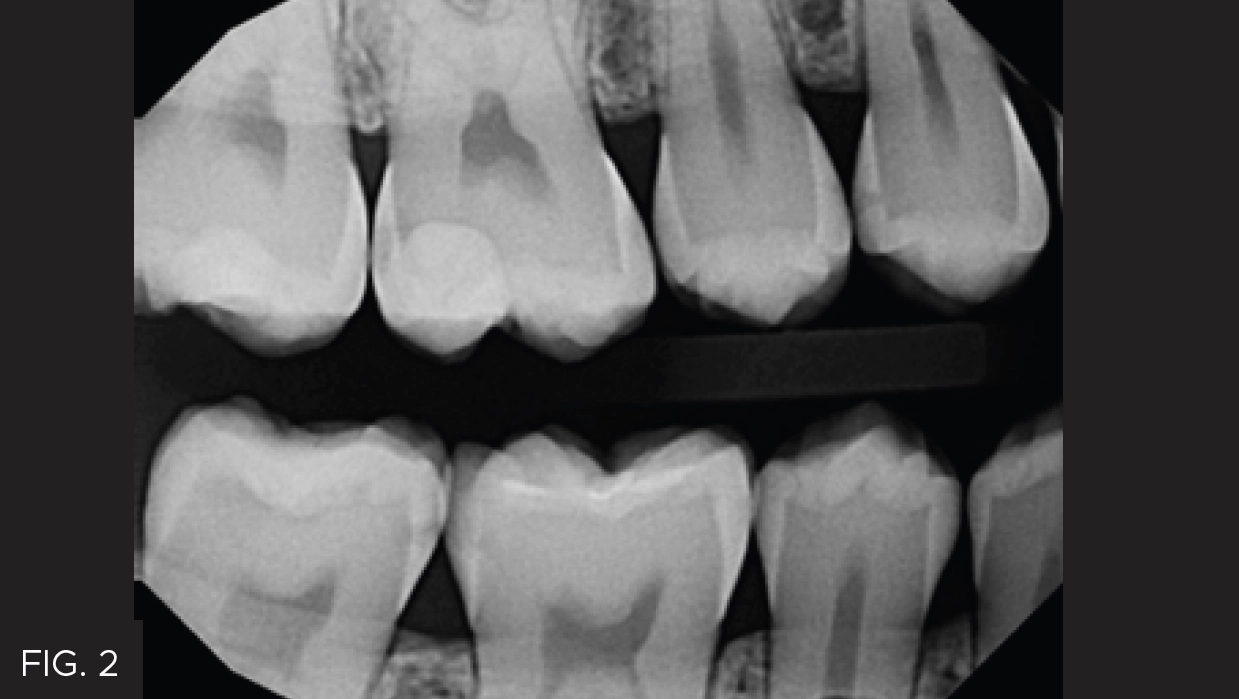
Class II carious lesion detected radiographically on the distal of tooth #5.
Before caries removal, it is helpful to pre-wedge using the DualForce™ Active-Wedge™ (Clinician’s Choice). This method enables gentle separation of the teeth, protecting the adjacent tooth from accidental bur contact and negating the need to break the contact. Once the preparation was complete, the DualForce Active-Wedge was removed. Complete caries removal was verified using caries indicator dye. The line angles of the preparation were slightly beveled to allow for better adaptation of the composite restoration, followed by air abrasion with 27-micron aluminum oxide particles using PrepStart™ (Zest Dental Solutions®) to remove any debris and biofilm.
The DualForce Sectional Matrix System by Clinician’s Choice has been carefully designed and crafted to address the modes of restorative failures. The DualForce™ Ultra-Wrap™ M atrix B and ( Clinician’s Choice) was placed to fit passively past the interproximal box. This pre-formed matrix band is designed in such a way that the buccal, lingual, and cervical components of the band hug the contours of the tooth, and the contact is already pre-formed in the band so that minimal or no burnishing is needed to form the contact point.
The DualForce Active-Wedge (Clinician’s Choice) was then placed interproximally between tooth #4 and #5. The wedge’s unique design further ensures the band’s tight seal to the tooth. Unlike most wedges that are stiff and sometimes difficult to place interproximally, the Active-Wedges are flexible due to their wide variety of interproximal shapes and sizes. They can change shape by becoming narrower at the collapsible tip while trying to fit into tighter interproximal spaces. Once placed, they are able to regain their original shape to completely seal the matrix band against the tooth, fit the contours of the neighboring tooth, and prevent pop-out. Selecting the largest wedge that will slide into the interproximal space is important, allowing for the tightest seal of the matrix to the tooth around the gingival margin.
In addition to the superior design of the DualForce Ultra-Wrap Matrix Bands and the DualForce Active-Wedges, the DualForce™ Ring is the final component in this system to ensure the proper isolation and seal for the restoration. (FIG. 3) The DualForce System has a smaller orange pre-molar ring and a larger green molar ring. The use of one or the other is at the clinician’s discretion, taking into account the degree of access and the use of multiple rings simultaneously. The DualForce Ring Forceps were positioned into the DualForce Ring engagement slots and the ring was placed over the wedge, engaging the DualForce Ultra-Wrap Matrix Band. Then, visual confirmation was used to see that the DualForce Ring sat at a 20-degree angle to the occlusal plane. This design is twofold: it creates maximum separation interproximally and prevents interference with the adjacent rubber dam clamp. If needed, slight finge pressure is applied on the plastic tines to fully seat the ring, as any pressure on the NiTi rings may dislodge the ring.
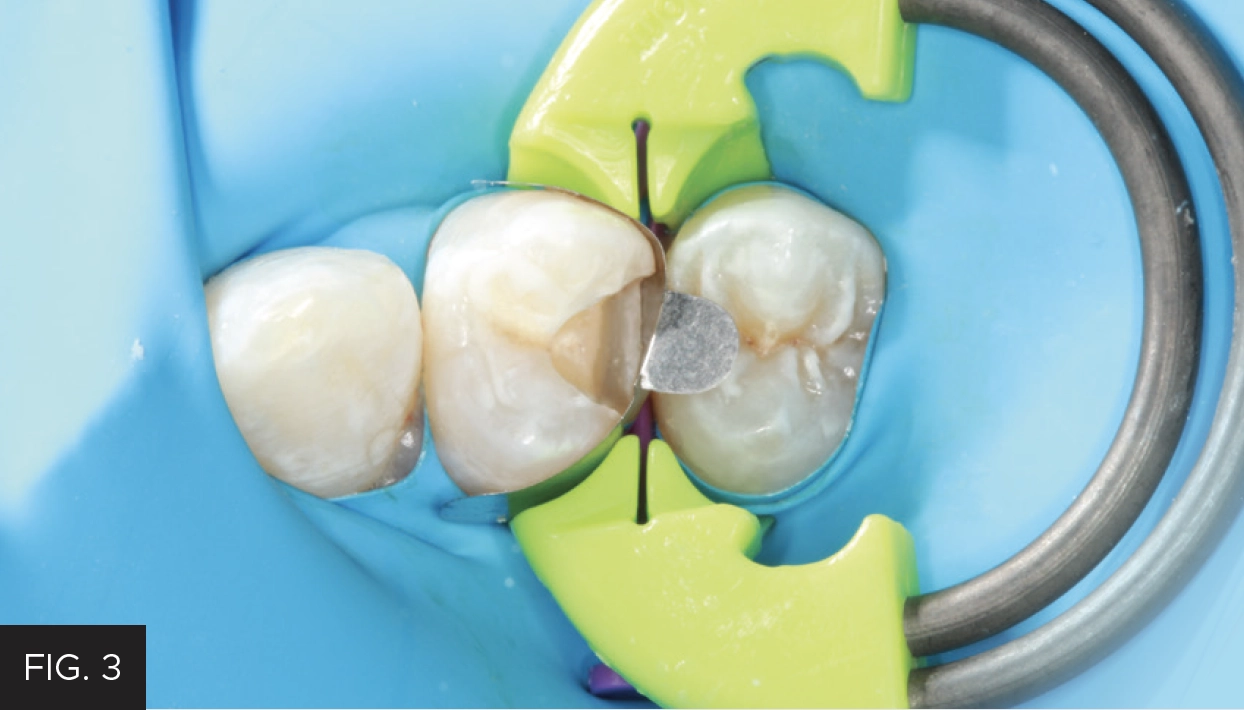
The DualForce Sectional Matrix System by Clinician’s Choice. Its innovatively designed components include the DualForce Ultra-Wrap Matrix Band, the DualForce Active-Wedge, and the DualForce Ring.
Before beginning the restoration, the proximal box’s marginal seal was inspected to make sure the proximal portion of the matrix band was in contact with the adjacent tooth. The contour of the matrix band already allows for good contact, so only slight or no burnishing of the contact point was needed.
The selective-etch technique was used, etching only the enamel surfaces with 35% phosphoric acid etch for 15 seconds. (FIG. 4) The tooth was then rinsed and dried. Adhesive (Adhese® Universal VivaPen®, Ivoclar) was then placed and agitated on the dentin and enamel surfaces for 20 seconds, dried with air, and light-cured with a high-performance LED polymerization light (Bluephase, Ivoclar) for 20 seconds.
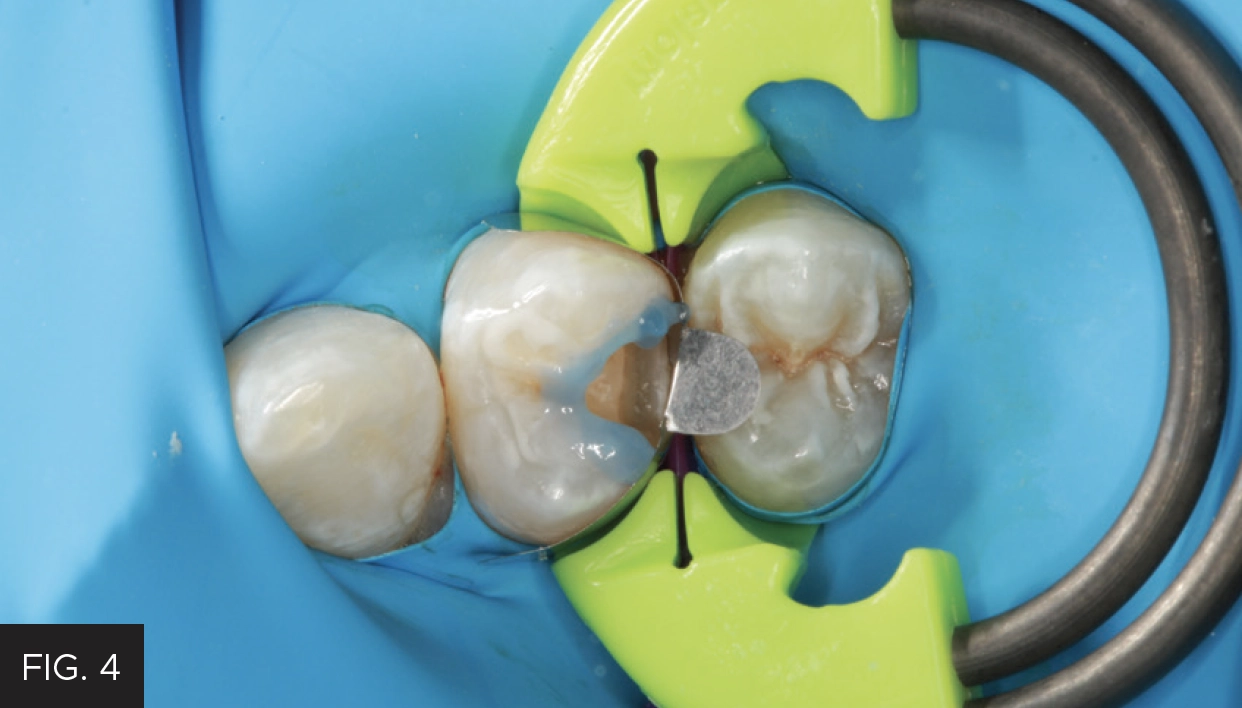
The selective-etch technique was used prior to placement of the adhesive to maximize the bond strengths while minimizing any risk of post-op sensitivity.
Evanesce™ Nano-Enhanced Universal Restorative ( Clinician’s Choice) in shade A3 was applied in 2mm increments utilizing the Compo-Ject™ (Clinician’s Choice) composite gun. Each layer was adapted to the preparation using the OptraSculpt® Instrument with ball modeling attachment (Ivoclar). The final layer was contoured with the Composite Ninja Instrument (Clinician’s Choice), as its unique angulated two-sided blade allows easy access to all areas of the tooth surface and then light-cured for 20 seconds. (FIG. 5)
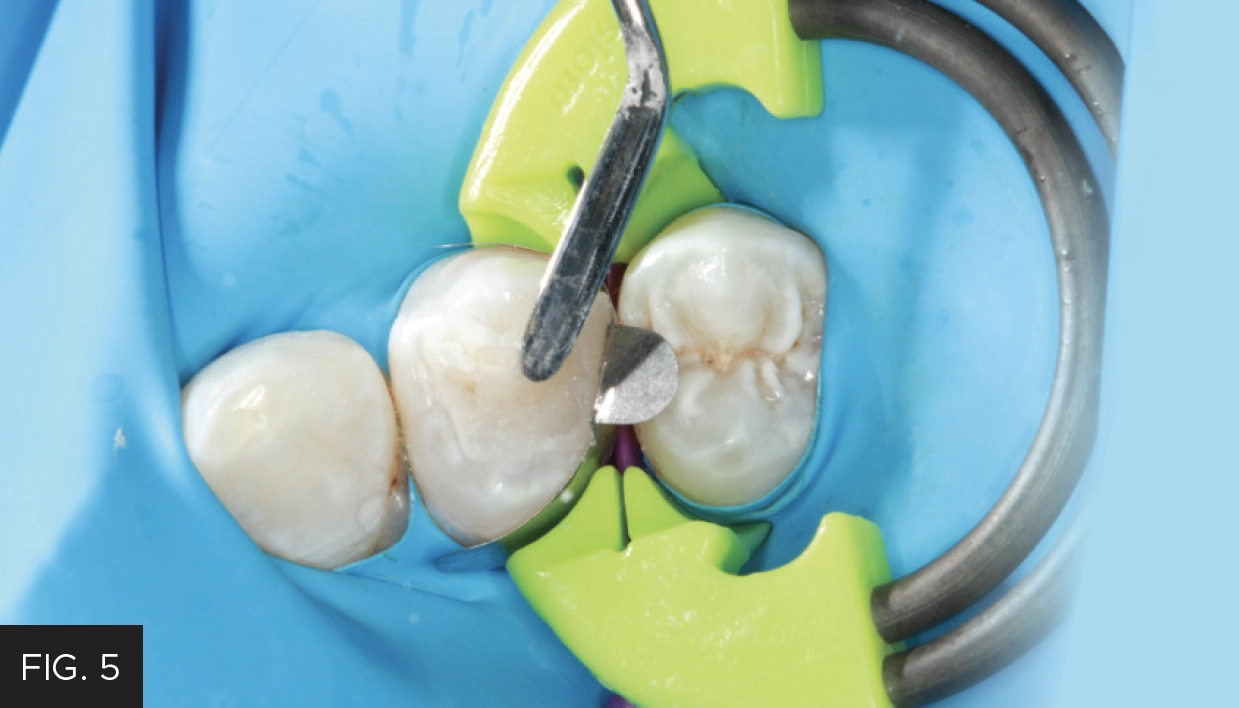
Evanesce A3U composite (Clinician’s Choice) was sculpted and adapted to the preparation using a Composite Ninja (Clinician’s Choice). This versatile instrument has a thin 2-sided blade capable of reaching all surfaces of the tooth.
The first finishing and polishing steps were performed with the dam in place, utilizing a flame diamond bur to create tertiary anatomy and to remove any flash. Contours™ Finishing and Polishing Discs (Clinician’s Choice) were used to create the smooth surface and remove additional flash. Once the dam was removed, the occlusal adjustments were made, and final polishing was performed. Interproximal contacts were verified with floss, checking for a smooth surface and tight contact.
The post-operative result shows a smooth and ideal contour with a tight interproximal contact. (FIG. 6) These characteristics are critical in obtaining a result that yields easy cleansability and less potential for postoperative sensitivity. Utilizing the DualForce Matrix System allows for a predictable and reliable outcome to help achieve clinical success for your patients.

Post-operative result. Properly contoured proximal surfaces and strong, naturally placed interproximal contacts create an ideal environment for long-term restorative success.

ABOUT THE AUTHOR
Dr. Susan Prater-Kudlats is a general dentist in Jacksonville, Florida with a focus on cosmetic and restorative dentistry,
utilizing the latest digital technology. She graduated from the Medical College of Georgia in 2009 and continues to further her education through advanced training courses. She is currently attending the Kois graduate program and is set to graduate May 2024. Dr. Prater-Kudlats also serves as a Key Opinion Leader for Desktop Health, one of the leading dental 3D printing manufacturers. Dr. Prater-Kudlats enjoys sharing her life and love of dentistry via instagram @dr_seuzz. Her creative social media presence has led to speaking engagements on social media branding for dentists featured by Cerec Doctors (CDOCS), as well as opportunities to promote the products that she believes give her the ability to deliver the best patient care possible.
Share This Article! Choose Your Platform
Products Mentioned in this article


Related Articles
The Back-to-Back Class II Composite: A Predictable Workflow for One of the Most Common Clinical Procedures
By Megan Shelton, DMD
While it may be one of the most common procedures in most restorative dental offices, the efficient placement of multiple Class II composites in a single quadrant can be technically demanding. Creating strong and natural proximal contours and contacts with the restoration of even a single Class II composite restoration can pose a challenge using traditional matrix systems.
Using Affinity Crystal and Evanesce Flow in an Injection Molding Technique
By Susan Prater-Kudlats, DMD
The injection molding technique is gaining popularity for dental clinicians due to its wide array of procedural applications. This technique involves injecting a low viscosity resin composite through a transparent silicone index made from a diagnostic wax-up, aiming to replicate the mock-up.
Ask the Expert: An Interview with Nate Lawson, DMD, PhD on Sectional Matrix Systems
By Nate Lawson, DMD, PhD
What is the advantage of using sectional matrices over circumferential matrices for composite restorations?