Creating Beautiful Anterior Composite Restorations
I believe there are two important concepts that should be embraced when considering direct restorative materials for anterior restorations: 1. Composite restorations can be indistinguishable from natural dentition and 2. Composite materials aren’t an inferior option to porcelain. I’ve placed and reviewed many cases and it can be nearly impossible to tell the difference.
A dedicated direct restorative workflow can consistently and predictably result in a high degree of esthetics in anterior composite dentistry, with minimal tooth reduction. Tooth preservation, especially in younger patients, is critical as many patients seeking to improve their smile fit this category. With a vast amount of information available on the internet and social networks, these savvy patients are aware of various treatment options and are eager to avoid those that “grind their teeth down”.
Becoming proficient in esthetic composite dentistry adds control over the process and leads to predictability of the final esthetic result. Clinical challenges with indirect restorations do not apply to direct composite restorations. There is no tooth reduction guidelines, temporization period, potential for undercuts, scanning and impression inaccuracies, and uncertainty as to the esthetics of the final restoration itself. Composite restorations are repairable and easily repolished when the initial luster is lost, extending its life expectancy. Delivering consistently predictable, high-quality esthetic results, however, require a well-developed workflow that is diligently followed in each case.
Natural teeth display uniqueness in their level of translucency, shape, and surface texture. As clinicians, we cannot attempt to replicate the natural tooth without acknowledging these variations, as well as having a deep understanding of the composite materials that we combine to replicate this. Each case is diagnosed and evaluated in the same manner. By doing this, you add organization and priority to the treatment plan. More information is revealed through a wax-up on a diagnostic model, creating the best possible restoration that reflects the ideal shape, contours, and incisal edge location. I recommend that the clinician do the wax-up, as this allows the opportunity to become familiar with the existing dentition and occlusion. The importance of creating the correct anatomical shape and surface texture cannot be understated. Along with an accurate shade selection, these characteristics contribute significantly to the restoration’s ability to blend into the dentition seamlessly. Clinically, the morphology of the wax-up will be transferred to the tooth at the restorative appointment using buccal and lingual matrices. Doing this adds to the efficiency and the predictability of the final restorations.
The following case presentation will outline the various aspects and rationale behind the materials and techniques that make up an ideal workflow.
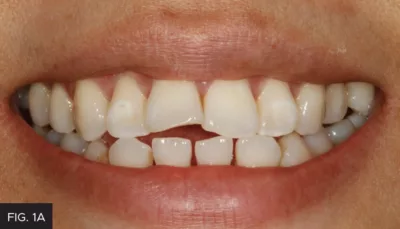
A young woman presented to my office looking for longterm options to restore chipped and worn central incisors without sacrificing tooth structure. She had found me through word of mouth and was seeking out a dentist experienced in minimally invasive esthetic dentistry. Teeth #8 and #9 were missing significant portions of the incisal one-third without a history of these teeth ever being restored. The young woman reported her habit of chewing on pens, which led to incisal fractures. Doing this over 5-6 years led to further wear of these areas. She committed to ending this habit and looked forward to restoring these teeth.
I approached this case, as I do every case, with the Kois 10-step Management Considerations. In this instance, Step 1 (upper anterior), Step 2 (upper posterior), Step 3 (lower anterior) and Step 4 (lower posterior) were applicable. In addition to the fractured teeth, her anterior teeth were misaligned. (FIG. 1A and 1B) The patient agreed to a treatment plan that included an aligner therapy to straighten the four maxillary anterior teeth (lateral incisor to lateral incisor), whiten her dentition, and restore teeth #8 and #9 with composite resin.
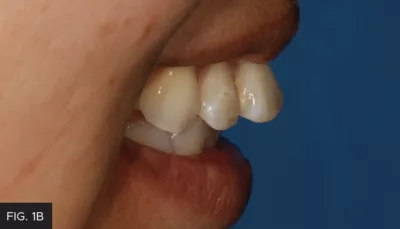
A young patient presented seeking restorations for her maxillary incisors. Years of pen chewing had resulted in fractures and incisal wear of teeth #8 and #9. Malalignment of the anterior teeth and arch discrepancies would also require consideration as part of an esthetic solution.
Before this appointment, a diagnostic wax-up was fabricated on her postorthodontic model to duplicate the missing tooth structure. Making the wax restorations as exact as possible will enable the final shape, incisal edge position, and contours to become a clinical guide. Lingual and buccal matrices were made from this wax-up. A prototype using fastsetting, highly accurate PVS putty (Clinician’s Choice®) was used for each matrix. The lingual matrix extends from cuspid to cuspid, covering the entire lingual surface up to and including the inciso-facial line angle. The buccal matrix covered the facial surfaces of the six maxillary teeth, extending beyond the free gingival margin. A sharp blade created two incomplete, horizontal cuts that represented the intersection of the three facial planes. These sections can be peeled back from the teeth once in place and function as a guide for placing the ideal thickness of each subsequent composite layer.
After a short treatment period of aligner therapy using ClearCorrect® (Straumann) and tooth whitening with KoR® Whitening (Evolve Dental Technology), the patient was ready for her restorative appointment. Understanding and familiarizing yourself with the optical and physical properties of the composite you are considering using is extremely important. When working with a new composite, I create small discs, 0.5mm thick, of multiple shades that are then polished. These discs allow an evaluation of opacity and translucency. This information is mentally stored and applied to the appropriate clinical situation. Evanesce™ (Clinician’s Choice), a nano-hybrid universal composite is an excellent material for Class IV restorations and composite veneers. The dentin shades have 90% opacity, which effectively masks the fracture line or preparation margin. The enamel shades, at 80% opacity, are ideal for most proximal and incisal translucencies. There are three additional enamel shades of 50%, 60%, and 70% opacity that are useful when more translucency is required. Evanesce is easily manipulated and sculpted without slumping, and quickly polishes to a high luster, retaining this gloss over time.
The shade “recipe” was determined when the patient sat in the chair. This consisted of creating thin discs representing the dentin shade of Evanesce layered with the enamel shade, then placed on her unetched, unbonded teeth and light-cured. Shade recipes, rather than individual shade selection, are created on the hydrated tooth to identify the shades and opacities that will create the perfect recipe to match the native tooth structure. The dentin shade must have the opacity to mask the fracture line and the enamel composite’s translucency must reflect that of the adjacent teeth. If the hydration of the tooth structure is not maintained, the patient must return on another day. The value of the potential composite shade is always confirmed first. Due to unique optical properties and blending of Evanesce with the tooth, there is tolerance for mis-shading. However, the value of the selected Evanesce shade must be a perfect match for the restoration to blend into the rest of the dentition.
A simple black-and-white photograph of the light-cured composite was taken with a smartphone, which validated the correct value. (FIG. 2)
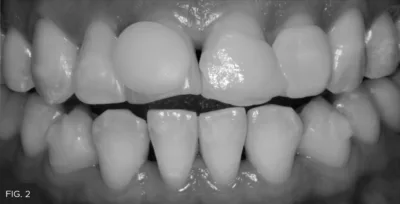
Shade recipes are obtained through the creation of discs on hydrated teeth. The discs are made up of layers of potential shades and opacities of composite. A black and white photograph verifies that the value of the selected composite is a match to the existing dentition.
A wet two-by-two gauze was applied to the discs and the shade was evaluated in ambient light conditions. This step typically takes 10-15 minutes the day the restorations are placed. This is time well spent if you considered the time it would take to remove the composite at the end of placement if the result were unsatisfactory. The selected shades were Evanesce B1D, B1E, and Evanesce FX shade Enamel White (ENW) with an opacity of 70% for the lingual enamel layer.
Anesthesia was not required, and isolation was obtained using an OptraGate® lip and check retractor (Ivoclar). The OptraGate retractor allows visualization of the free gingival margin while a rubber dam may displace its natural location. Once the lips were retracted, a plain 00 cord was placed in the gingival sulcus of teeth #8 and #9.
The lingual matrix was tried, and its accuracy was verified. Using a #6 explorer, a line was scribed corresponding to the fracture line on each tooth. The buccal matrix was subsequently tried, and both were set aside.
Bevel design plays a significant role in the degree to which the restoration will disappear into the tooth. The fracture lines on teeth #8 and #9 received a 45° bevel using a course, black striped, diamond bur in a highspeed handpiece. A F8888 fine diamond (Brasseler USA®) was used to complete a starburst bevel of 4-5 mm. (FIG. 3)
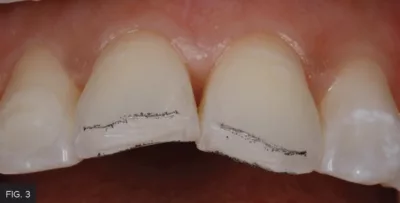
Bevel design is essential to the blending of the composite into the surrounding tooth structure. An immediate bevel of 45° is made on the fracture using a coarse diamond bur, followed by a starburst bevel extending approximately 5mm onto the facial enamel with a F8888 diamond bur.
Mylar strips were placed between teeth #7 and #8, #8 and #9, and #9 and #10. Phosphoric acid was placed on the enamel surfaces, extending beyond the preparation. After 20 seconds, the acid was thoroughly rinsed off and the teeth were air-dried. All-Bond Universal® adhesive (Bisco) was used in the selective-etch format. The phosphoric acid is necessary to effectively create the etching pattern required to bond the composite to the surface. One coat of All-Bond Universal adhesive was applied to each tooth, scrubbed in for 10 seconds, and air thinned. The adhesive was light-cured for 10 seconds per tooth and the mylar strips were removed.
A layer of Evanesce Enamel White (ENW) was placed into the lingual matrix in the area corresponding to tooth #8, using a Compo-Ject™ (Clinician’s Choice) composite gun. To avoid trapping air, the tip of the compule never left the composite. A Multi-Use Composite Instrument (Cosmedent®, Inc.) was used to adapt a very thin, uniform layer of ENW between the inciso-buccal line angle and the scribed line on the lingual matrix. The lingual matrix was placed on the teeth and this layer was gently connected to the lingual margin of the preparation using the Multi-Use Instrument. A #3 Composite Brush (Cosmedent, Inc.) lightly coated with ResinBlend LV (Clinician’s Choice) smoothed and further thinned out the lingual shelf, removing any excess ENW at the inciso-facial line angle with the Multi-Use Instrument. This unfilled modeling resin does not contain HEMA, so it will not alter the physical properties of the composite, nor will it discolor over time. The lingual layer was then light-cured for 20 seconds and the lingual matrix was gently removed. (FIG. 4)
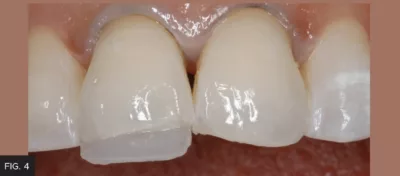
The lingual shelf is made using Evanesce ENW and replaces the more translucent lingual and incisal enamel. A very thin layer of ENW is first placed in the lingual matrix, then connected to the preparation once the lingual matrix is replaced onto the teeth, then light-cured for 20 seconds.
A gloved finger that was cleaned with alcohol gauze was used for rolling a small ball of the Evanesce B1D. The composite was extruded onto the finger with the compule tip always in composite to avoid incorporating the risk of air bubbles. The composite ball was gently placed onto the lingual shelf and patted flat with a clean gloved finger. The dentin layers were placed beyond the fracture line but not extended onto the proximal or incisal surfaces where the more translucent layer will be placed. The Multi-Use Composite Instrument and an IPC Long (Cosmedent, Inc.) further spread and adapted the B1D onto the lingual shelf, leaving 0.5mm space inter-proximally and incisally for the B1E enamel layer. A #6 explorer was used to finesse and establish dentinal lobes within this layer. At this stage, the buccal matrix was placed onto the teeth and the incisal flap was pulled back to assess the thickness of the dentin layer. This layer must leave approximately 0.5 mm space for the full contour of the enamel layer. Once verified, a #3 Composite Brush lightly coated with ResinBlend LV smoothed and blended the B1D. (FIG. 5)
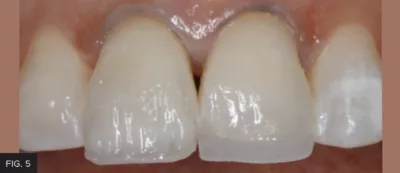
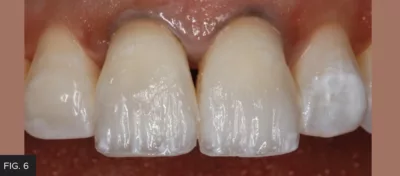
Evanesce B1D is rolled into a ball and gently placed onto the preparation and lingual shelf of tooth #8. The dentin layer is kept short of the incisal and proximal edges and allows for a 0.5 mm space for the enamel layer. Dentinal depressions are placed in the incisal 1/3 of the dentin layer. The buccal matrix is placed onto the teeth to verify the ideal thickness of dentin. This layer is then lightcured for 20 seconds.
The dentin layer was then light-cured. (FIG. 6)
The incisal edges of the adjacent teeth had significant translucency and hypocalcifications. At this point, a combination of white opaque and violet tint was conservatively placed and light-cured.
The pull through technique is an excellent method of producing predictable, intimate proximal contacts when placing the enamel layer. Mylar strips were placed into the sulcus interproximally on the mesial and distal. Evanesce B1E was placed on the clean gloved finger and rolled into a ball. This was then pressed into the proximal areas of the preparation using the spoon end of the Gold Esthetic Contouring Instrument (Clinician’s Choice). The mylar strip is gently pulled toward the lingual while maintaining light pressure on the facial end. This technique was performed on each proximal surface. The paddle end of the Gold Esthetic Contouring Instrument was used to smooth the B1E toward the incisal, establishing the three facial planes. Excess B1E was removed at the incisal edge. The enamel layer should be approximately 10% over-contoured to allow for finishing and polishing. ResinBlend LV on a #3 Composite Brush helped create a smooth, blended surface before light-curing. (FIG. 7) This composite placement workflow was repeated for tooth #9.
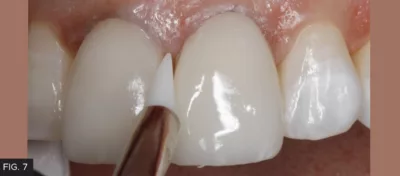
Once Evanesce B1E is placed onto teeth #8 and #9 as a small ball and pressed into the proximal areas of the preparation, the pull-through technique utilizing mylar strips ensures a well contoured, intimate proximal contact. The enamel layer is then smoothed, and the excess trimmed at the gingival margin and incisal edge prior to light-curing for 20 seconds.
Once the 00 cords were removed, the primary anatomy was assessed using the side of a pencil to locate the proximal line angles and incisal edges of the restorations and adjacent teeth. The proximal line angles, facial planes, and incisal embrasures were adjusted using coarse and medium Sof-Lex Discs™ (3M™). A wet gauze provided a momentary shine to help monitor the adjustments.
With the primary anatomy established, pencil lines are drawn bisecting the tooth vertically and two lines dividing the tooth horizontally into the three facial planes. Facial depressions in the incisal plane and into the mid-facial plane was placed using the convex section of the F8888 fine diamond bur at 10-12,000 RPM. A wet gauze is used frequently to maintain a clear field to gauge depth and avoid the incisofacial line angles. Bullet-shaped aluminum oxide Contours™ Coarse Anatomy Trimmers (Clinician’s Choice) used at slow speed removed surface scratches left by the bur and softened the facial depressions. At this point, the 44 micron diamond particle A.S.A.P.® Pre-polisher (Clinician’s Choice) at 12,000 RPM was used to remove the remainder of the surface scratches and blend the facial planes.
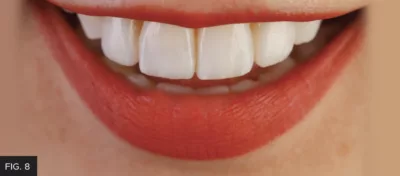
Perikymata tend to be more common on younger teeth, which was the case with this patient. The F8888 diamond bur at approximately 5,000 RPM was used with a light touch in a horizontal sweeping motion, from mesial to distal and back again, imitating the natural perikymata. A wet gauze removed the dust from the tooth surface and the 4-6 micron diamond A.S.A.P. Final High Shine Polisher at 12,000 RPM created a high luster in seconds. The final polish was achieved with a Final Shine Cotton Polishing Wheel (Clinician’s Choice) with a light touch at 12,000 RPM onto Enamelize™ polishing paste (Cosmedent, Inc.) that had been smeared onto the teeth. (FIG. 8 and FIG. 9)
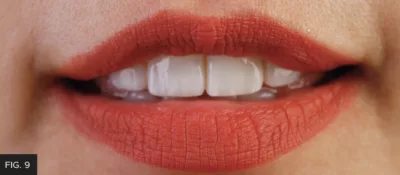
Post-op photos taken several days later to assess the esthetic restorative result once the teeth had rehydrated. This case was a perfect match to the adjacent teeth in shade, primary, secondary, and tertiary anatomy.
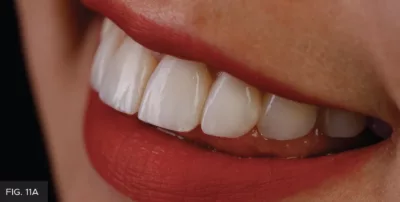
Predictable, highly esthetic composite dentistry is consistently achievable with a commitment to following an established workflow. Clinicians can reduce stress when an esthetic restorative outcome is anticipated based on workflow. The advantage of minimally invasive esthetic dentistry is possible without compromising a long-term result. More patients are looking for this option and looking for dentists who offer this service. This patient was overwhelmed with her new smile. Post-op portrait photos are taken to capture the joy and confidence that these treatments bring about. (FIG. 10)
While the esthetic improvements are usually limited to dentition, their effect on the patient’s demeanor is clearly demonstrated in the picture. (FIG. 11A and 11B) This creates a rewarding experience for the patient and clinician, both eager to share it with others.

ABOUT THE AUTHOR
David Chan earned his DMD degree in 1989 from Oregon Health Sciences University. He maintains a full-time practice focused on cosmetic and comprehensive dentistry located in Ridgefield, Washington. David is the Past President of the American Academy of Cosmetic Dentistry, director at the Center for Dental Artistry and a Clinical Instructor at the Kois Center in Seattle, Washington. He is an Accredited member of the AACD and has been published widely in peer reviewed dental articles, including several articles in the prestigious “Journal of Cosmetic Dentistry.” In addition, David travels nationally/internationally giving lectures to dentists on comprehensive esthetic dental care and serves as a key opinion leader for many dental products companies.
Share This Article! Choose Your Platform
Products Mentioned in this article
Related Articles
Take 5: 5 Restorative Clinicians’ Take On Evanesce Nano-Enhanced Universal Restorative
5 Restorative Clinicians' Take On Evanesce Nano-Enhanced Universal Restorative.
Success and Predictable Results with Anterior Composites Every Single Time
By David Chan, DMD, AAACD
The ability to rehabilitate or enhance a smile using direct composite restorations in the esthetic zone can be considered the ultimate challenge for the cosmetic dentist.
Simple Concepts to Shape and Polish Anterior Composites to Rival Porcelain
By David Chan, DMD, AAACD
With contemporary direct composite systems, the clinician can now truly be a dental artist by conservatively and esthetically creating restorations that are so life-like that they virtually emulate the beauty of natural tooth structure.

