
A Systematic Approach to Contouring and Polishing Anterior Resin Composite Restorations: A Checklist Manifesto
INTRODUCTION
The placement of anterior composite resin restorations has become more systematic and simplified during recent decades, largely due to the introduction of more esthetic and natural tooth structure replicating materials. By acknowledging the interdependence of dentin and enamel, light and color, and morphological elements, manufacturers have produced materials, which resemble dentin and enamel optical properties like: shades, opacities, opalescence and fluorescence, which has enabled dentists to more predictably mimic adjacent natural teeth when direct composite restorations are required in the esthetic zone.1,2
The ability of today’s composites to disappear into the surrounding tooth structure contributes to natural-looking esthetics. This is facilitated by composites that demonstrate exceptional handling, strength, and polishability. (e.g., Evanesce Nano-Enhanced Universal Restorative, Clinician’s Choice, Filtek Supreme Ultra, 3M Dental, Estelite Omega, Tokuyama and others), ensuring the dentist’s ability to blend, sculpt, and adapt the material to the preparation is greatly enhanced.3
However, despite material advancements and the variety of multi- and single-layer techniques it remains quite common for the novice esthetic restorative dentist to produce restorations that do not seamlessly blend with the anatomy, gloss, and contour of adjacent teeth or restorations. Often contributing to this problem is the clinician’s inexperience or difficulty to identify what is specifically wrong with form and shape of the restoration and, most importantly, knowing how to correct it.4
Micro- and macro-morphology of natural teeth and restorations are as significant as—if not more so than—composite shade selection in determining the esthetics and life-like nature of direct composite restorations. In particular, several morphological characteristics of individual teeth—as well as the interaction of these traits across all teeth in the arch—influence light reflection, color perception, and observed proportional harmony in the smile as a whole.5 For this reason, an understanding of these details and how to incorporate them into anterior direct composite restorations is necessary when contouring, finishing, and polishing in order to deliver the most life-like and esthetic restorations.6
The purpose of this article is to describe a systematic, step-by-step checklist approach for predictably, practically, and repeatedly contouring and polishing these cases. Rather than emphasize material placement and layering, the case presented incorporates the use of a single shade, single opacity composite placement technique to create the ideal esthetic restorations.
As previously mentioned, due to the clinician’s inexperience or difficulty to identify what is specifically wrong with form and shape of the restoration and, most importantly, knowing how to correct it, it is quite important that the practitioner has: (a) the basic knowledge of the basic anatomical features that are present in the teeth to be restored (Diagram 1) and (b) follow a systematic approach to end up with a natural looking restoration (Table 1).
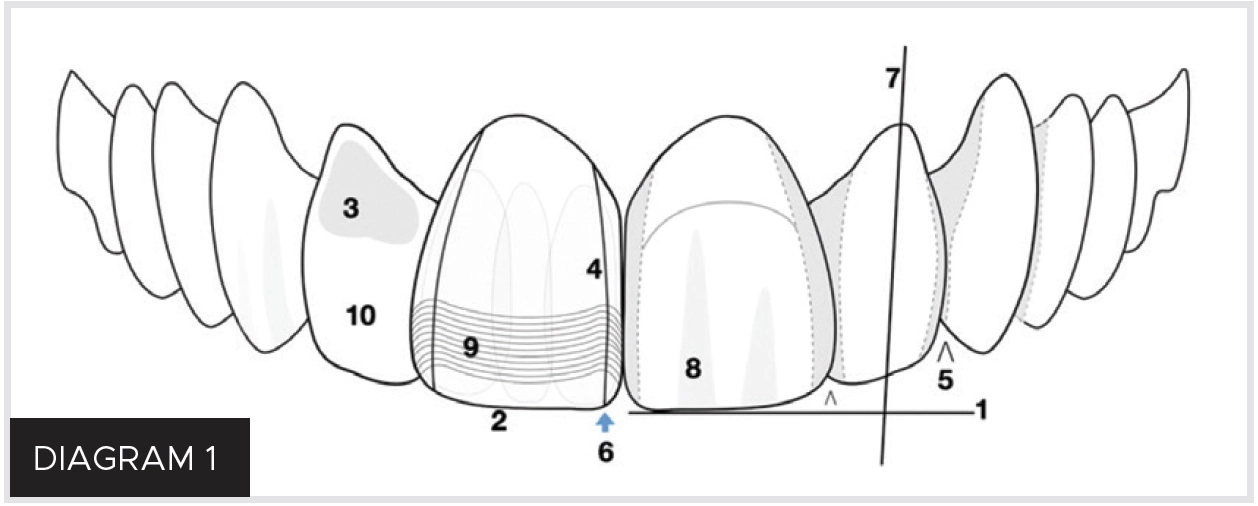
Table 1
Ten anatomical features and checks for systematic contouring and polishing.
This 10-step checklist deliberately and systematically undertakes a “divide and conquer” approach to focus the dentist’s attention on each individual anatomical component of the restoration. By approaching contouring and polishing in this manner, each section can be compartmentalized and isolated for better understanding, evaluation, visualization, correction, and ultimately, completion of an “imperceptible” restoration.7, 8 The dentist should become accustomed to observe the anatomical features on the adjacent teeth and reproduce them on the restoration. It is also the prerogative of the dentist to modify this protocol as his/her experience increases, thus visualizing and foreseeing their desired final surface characterization, luster, and anatomical contour.
The clinical technique presented in this article shows the advantages of using a step-by-step checklist approach to predictably and efficiently obtain ideal esthetics when performing anterior resin composite restorations.
CASE PRESENTATION
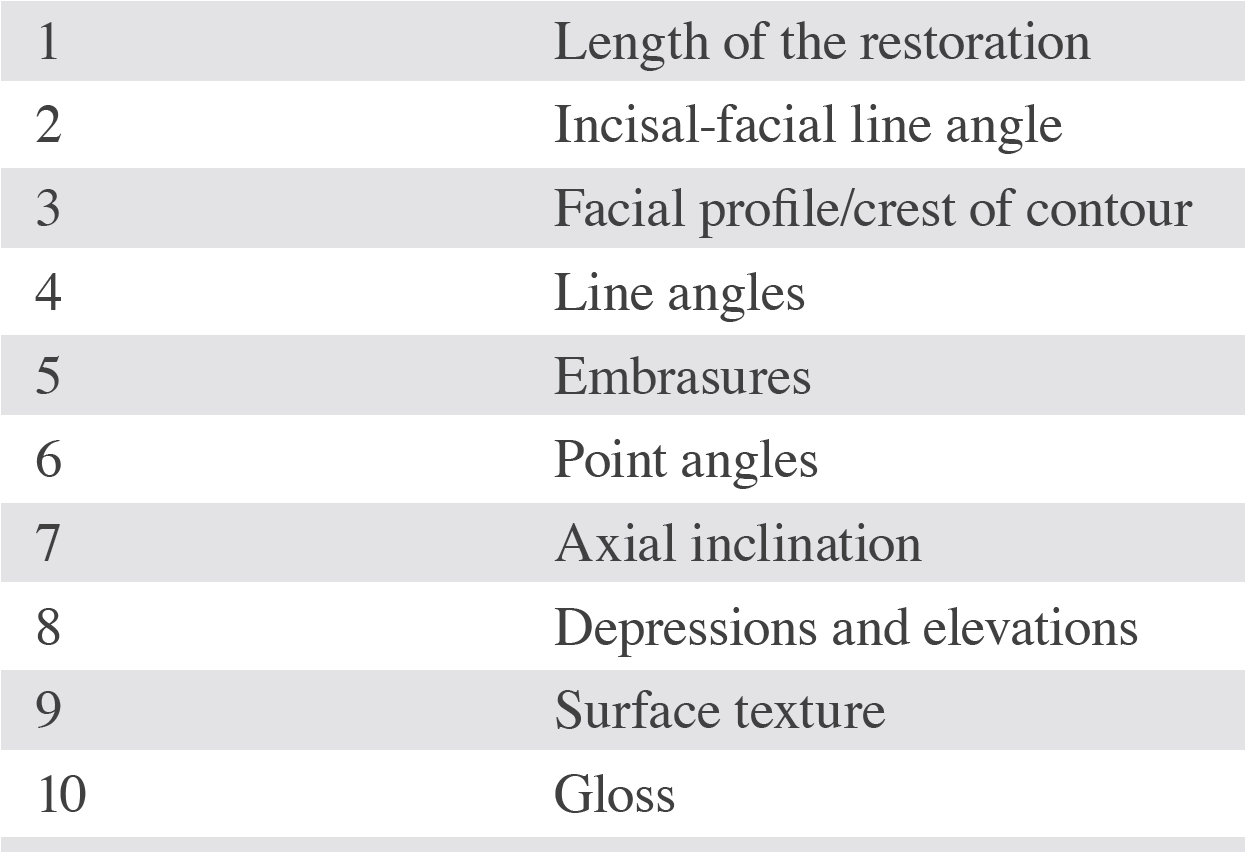
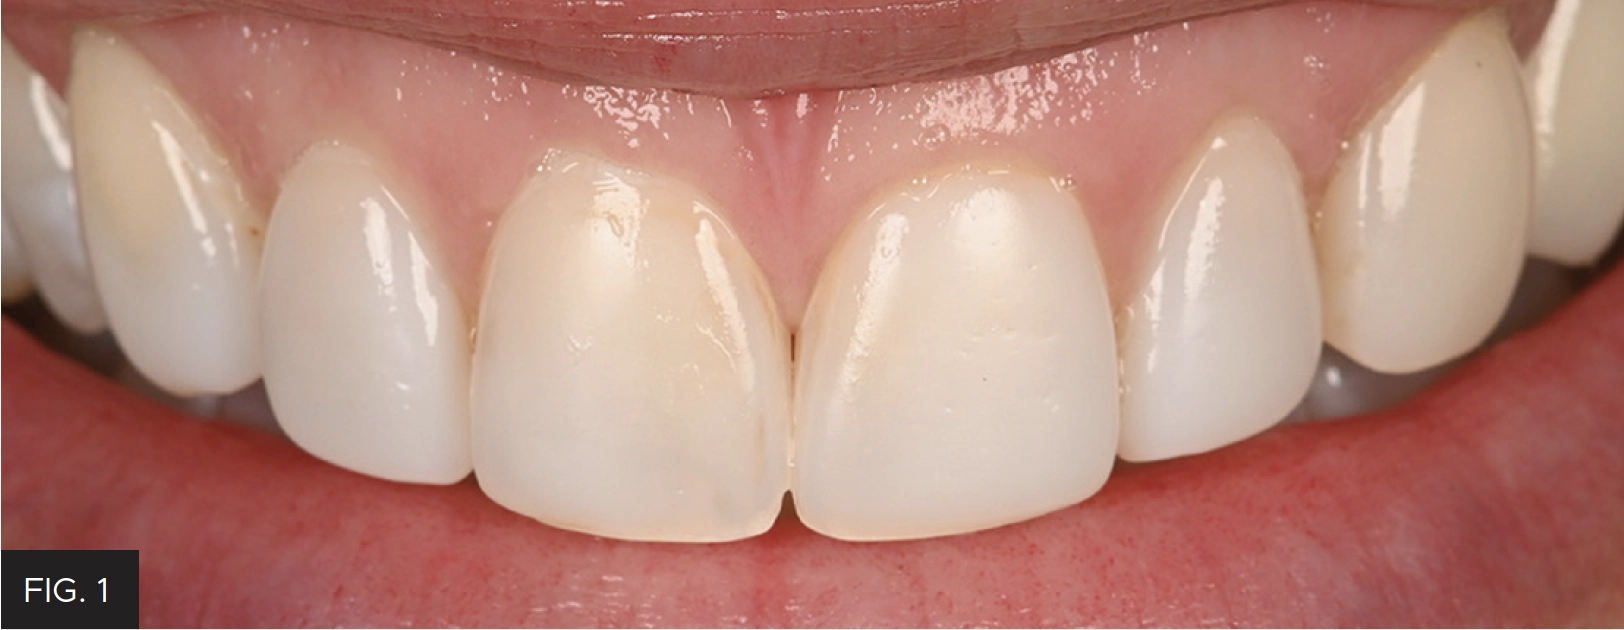
A female patient presented with a chief complaint about the appearance of her existing anterior composite resin veneers (FIG. 1 & 2), and she was ready to undergo treatment to have them corrected. After a thorough examination, the patient was presented with two treatment options: porcelain veneers or direct composite resin veneers. Due to financial constraints, the patient accepted treatment with direct composite resin veneers. Digital Smile Design (DSD) was then used to plan function, ideal tooth esthetics, shape, and anatomy.9
Pre-operative smile view of a patient who was unhappy with the appearance of her anterior resin composite veneers and ready to undergo treatment to have it corrected.
Retracted intraoral view of the patient’s pre-operative condition.
PREPARATION
Rubber dam isolation was established. (FIG. 3) The existing restorations were removed, the teeth conservatively prepared mostly in enamel, and the preparations were air-abraded with 50 micron aluminum oxide particles. A total-etch, three-step adhesive protocol (OptiBond™ FL, Kerr Corporation, Brea, CA) was then performed.
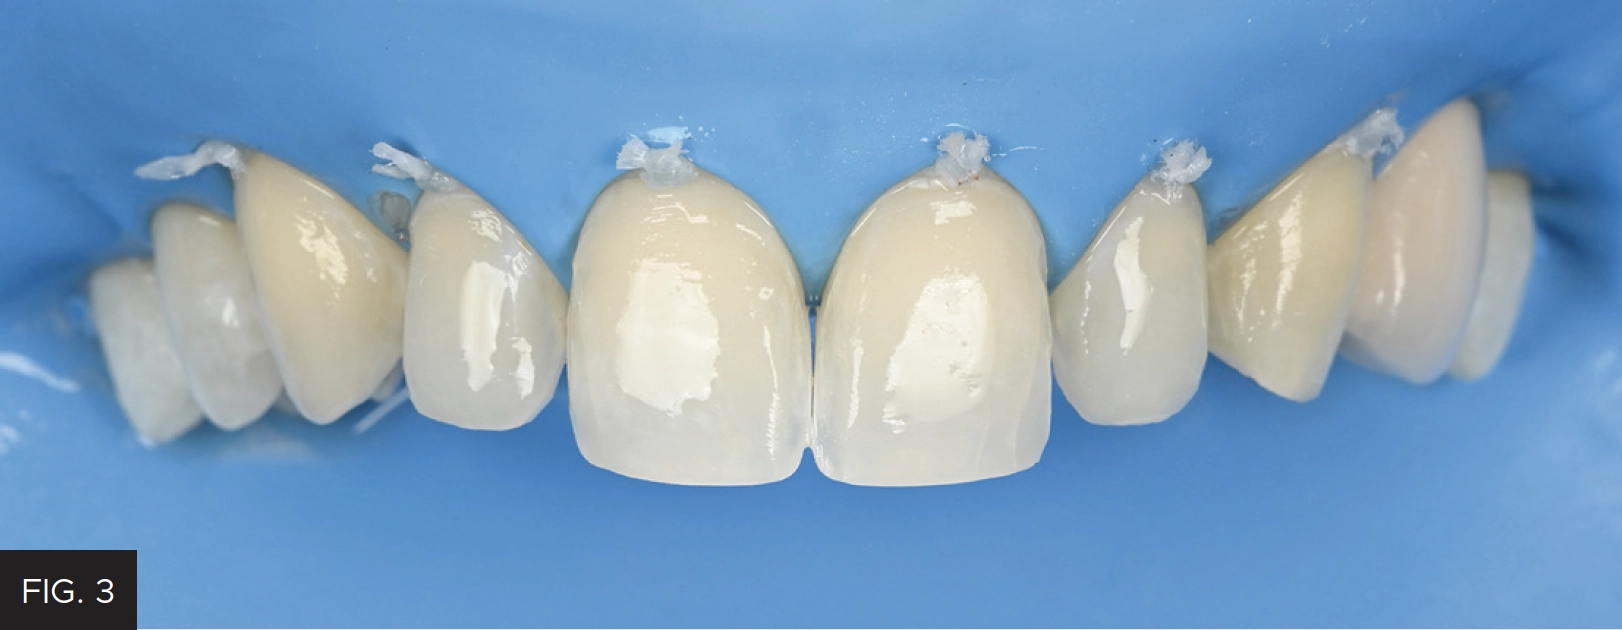
Rubber dam isolation was established, after which the existing restorations were removed and the teeth conservatively prepared.
COMPOSITE BUILDUP
A single shade of a nano-enhanced universal restorative material (Evanesce Nano-Enhanced Universal Restorative Composite Enamel White, Clinician’s Choice) was selected for this case. (FIG. 4) Several other materials also demonstrate beneficial handling characteristics (e.g., sculptability without slumping, non-sticky without pullback, high polishability), any selected composite should contribute to an efficient placement and seamless blending with the adjacent natural dentition. Additionally, it would facilitate adherence to a systematic protocol for contouring and polishing the proposed direct composite restorations.
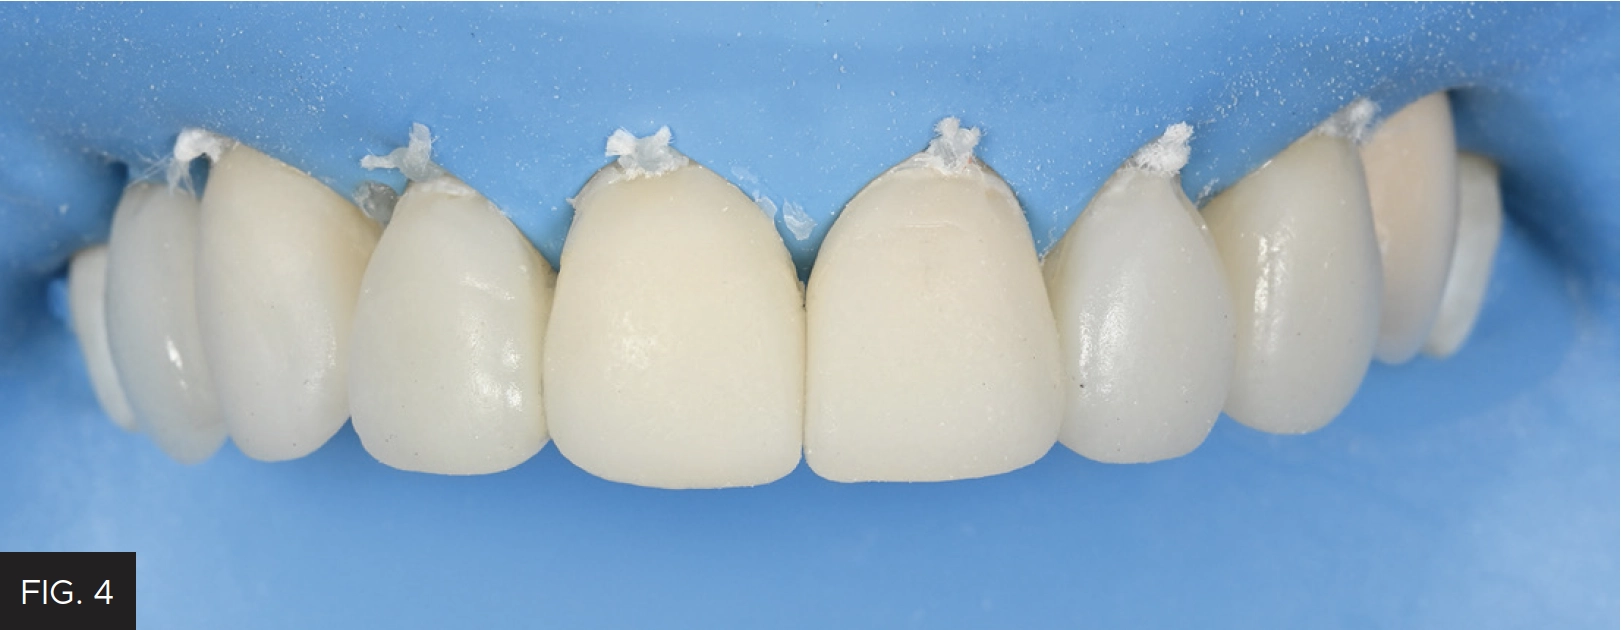
The direct veneer buildup was completed using a single shade of nano-enhanced universal composite material.
Check #1: Length of the Restoration
Following buildup of the veneer restorations, the incisal edge position of each single restoration was determined by analyzing the adjacent teeth according to the planned treatment based on esthetic and functional parameters. The central incisors were matched to each other, and lengths of contralateral pairs of teeth (e.g., laterals, canines, etc.) were also matched. During this step, the dentist’s focus should only be on tooth length. In this case, the vertical position of the incisal edge was adjusted and matched using medium grit aluminum oxide abrasive coated discs (e.g., Sof-Lex XT, 3M) at 10,000 RPM. When performing this step attention should be paid to the inciso-facial line angle and the inciso-palatal line angle, the incisofacial line angle is usually longer than the inciso-palatal line angle. (FIG. 5)
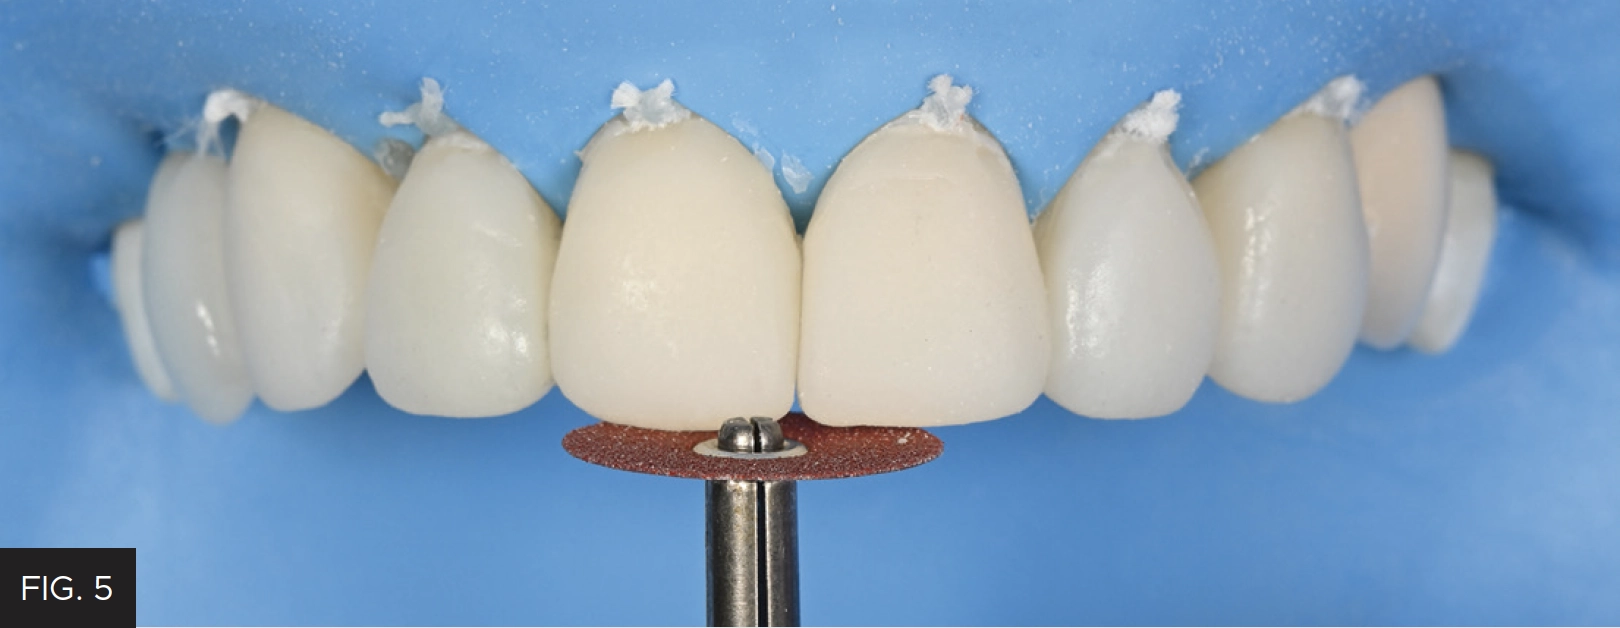
Fine grit aluminum oxide abrasive coated discs at 10,000 RPM were used to level the incisal edge.
Check #2: Antero-Posterior Incisal Edge Position
A pencil was used to mark the inciso-facial line angle, after which an occlusal view was used to determine the facio-lingual position of the incisal edge. (FIG. 6) The incisal-facial line angle should follow the natural arch form. In this case, a fine diamond or disc was used to impart these contours. Note that for single restorations, clinicians must ensure that the inciso-facial line angles match the position of adjacent teeth or contralateral teeth. When multiple restorations are placed, the antero-posterior incisal edge position should follow the natural arch curve. It is also recommended to finish from the restorative material to tooth structure to improve marginal adaptation.110
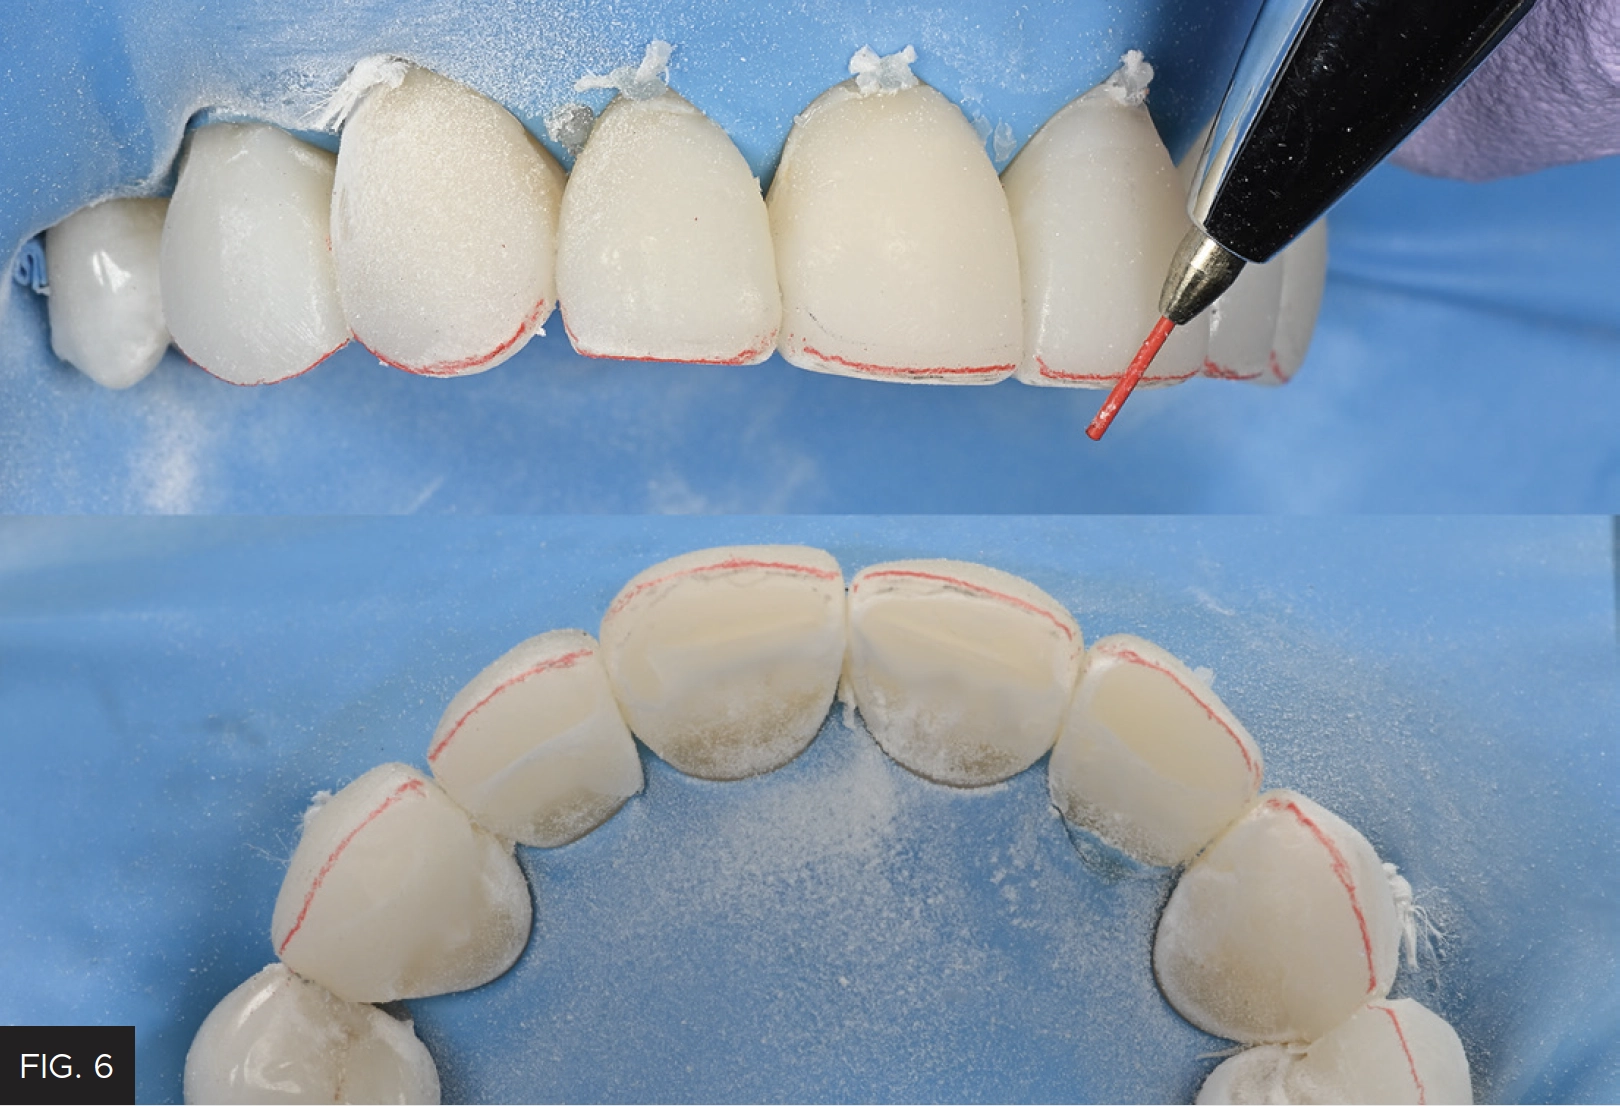
A pencil was used to mark the inciso-facial line angle; the occlusal view to determine the facio-lingual position of the incisal edge; and a fine diamond or disc to adjust these contours.
Check #3: Facial Profile/Crest of Contour/Cervical-Third Contour
A line was traced between the middle and gingival third on the adjacent teeth and restorations, which indicated where the height of contour should be positioned. (FIG. 7) An occlusal view facilitates evaluation to ensure replication and harmony of facial contours across natural teeth and the restorations. A fine diamond or a disc can be used to remove restorative material to define and align the facial contours.
Note that the following checks—#4, #5, and #6—are closely related because they each and collectively contribute to embrasure contouring, creating the restoration(s) framework.

To check the contour of the emergence profile and cervical third, a line was traced between the middle and gingival thirds on adjacent teeth; this line should indicate where the height of contour should be positioned.
Check #4: Transitional Line Angles
Transitional line angles were checked by penciling with two colors; one color for the actual crest of contour position; the other color to establish the desired line angle position. (FIG. 8) Line angles should mimic the contralateral tooth in shape and direction, and the distance from the line angles to the contact points should also match. Placement of the line angles closer to each other on the same tooth will create the illusion of a narrower tooth, on the contrary, the placement of the line angles farther apart will create the illusion of a wider tooth. A disc or diamond is used to contour the restoration(s) so that the line angles imitate those of a natural tooth.
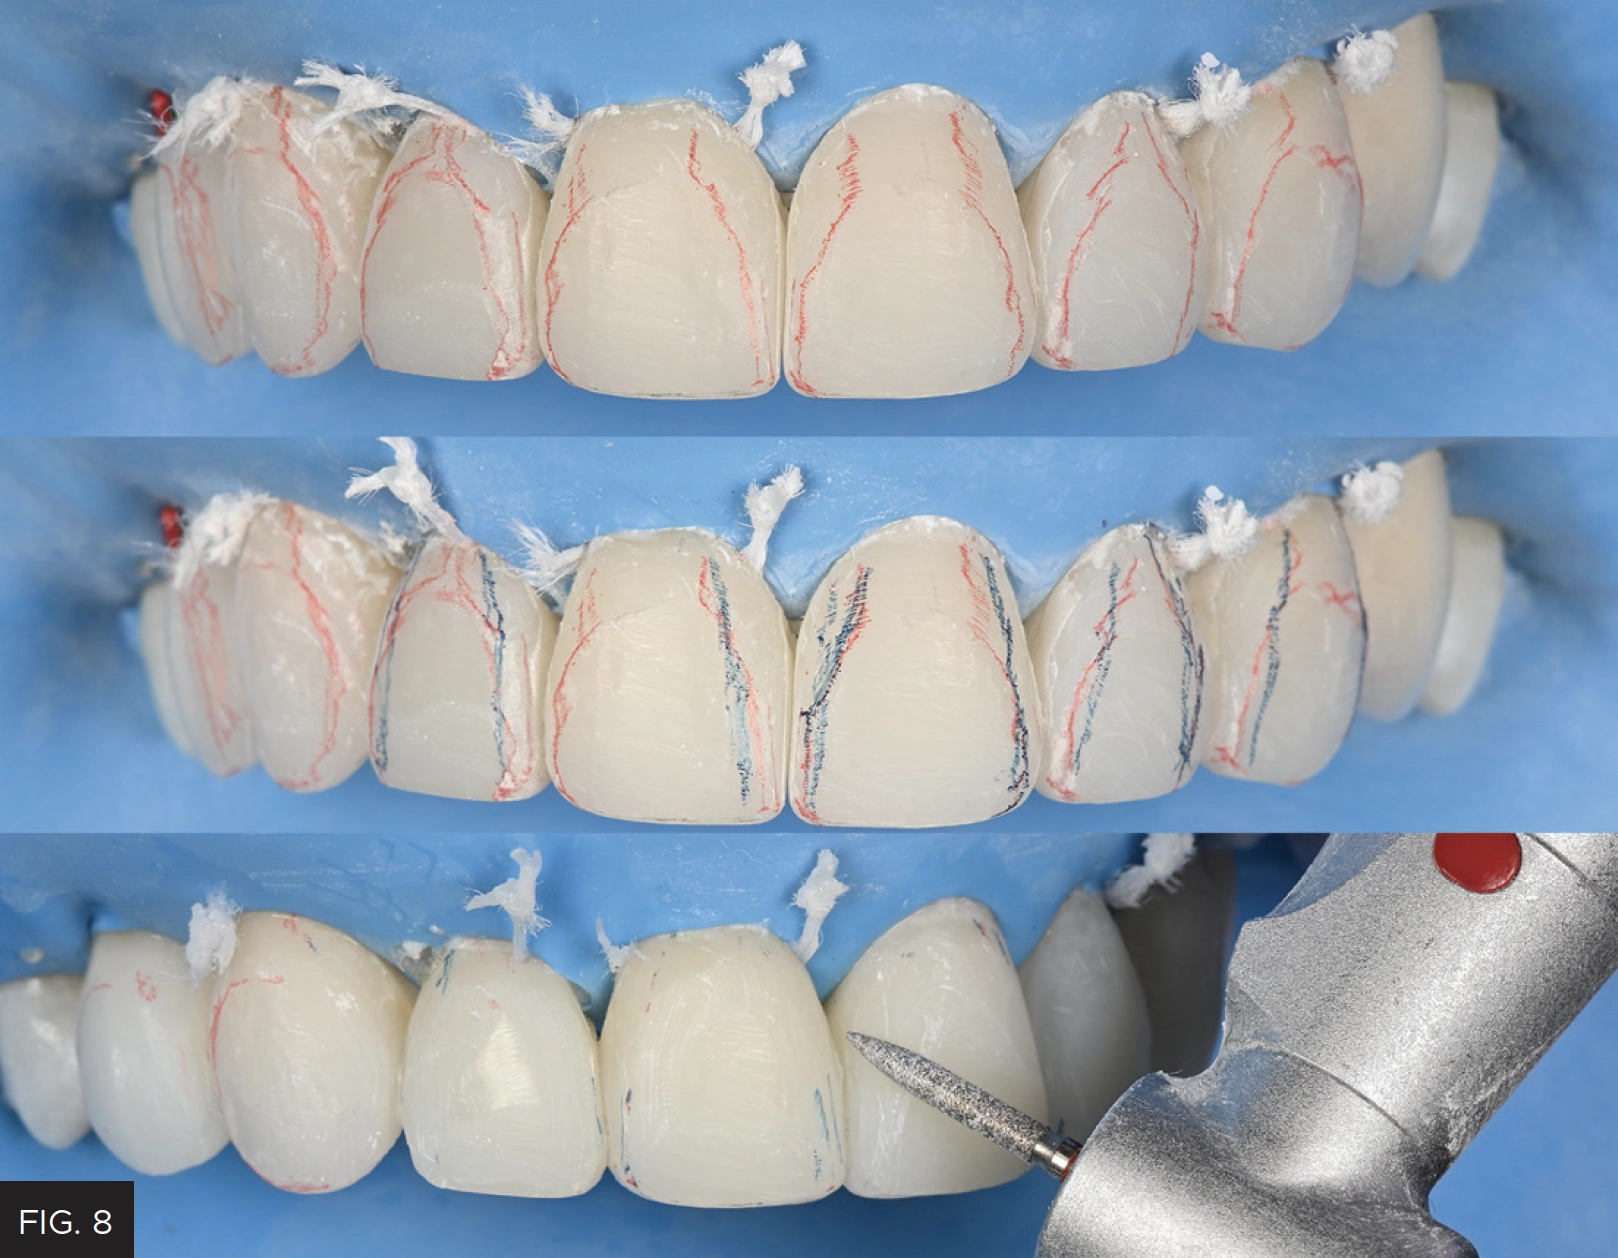
It is preferable to use two colors to pencil the transitional line angles; one color for the actual crest of contour or line angle position, and the other for the line angle desired position.
Check #5: Embrasures
The four embrasure surfaces (i.e., incisal, facial, gingival, lingual) surrounding the contact points were contoured with discs to achieve the proper shape and size. (FIG. 9) Also described as the “valleys” between teeth, these areas deflect light when viewed from the facial aspect and demonstrate different sizes. The incisal embrasures between the central incisors is smallest; embrasures between central and lateral incisors is larger; embrasures between laterals and canines is even larger. Dentists must exercise caution when observing contact point position, since it influences embrasure size.
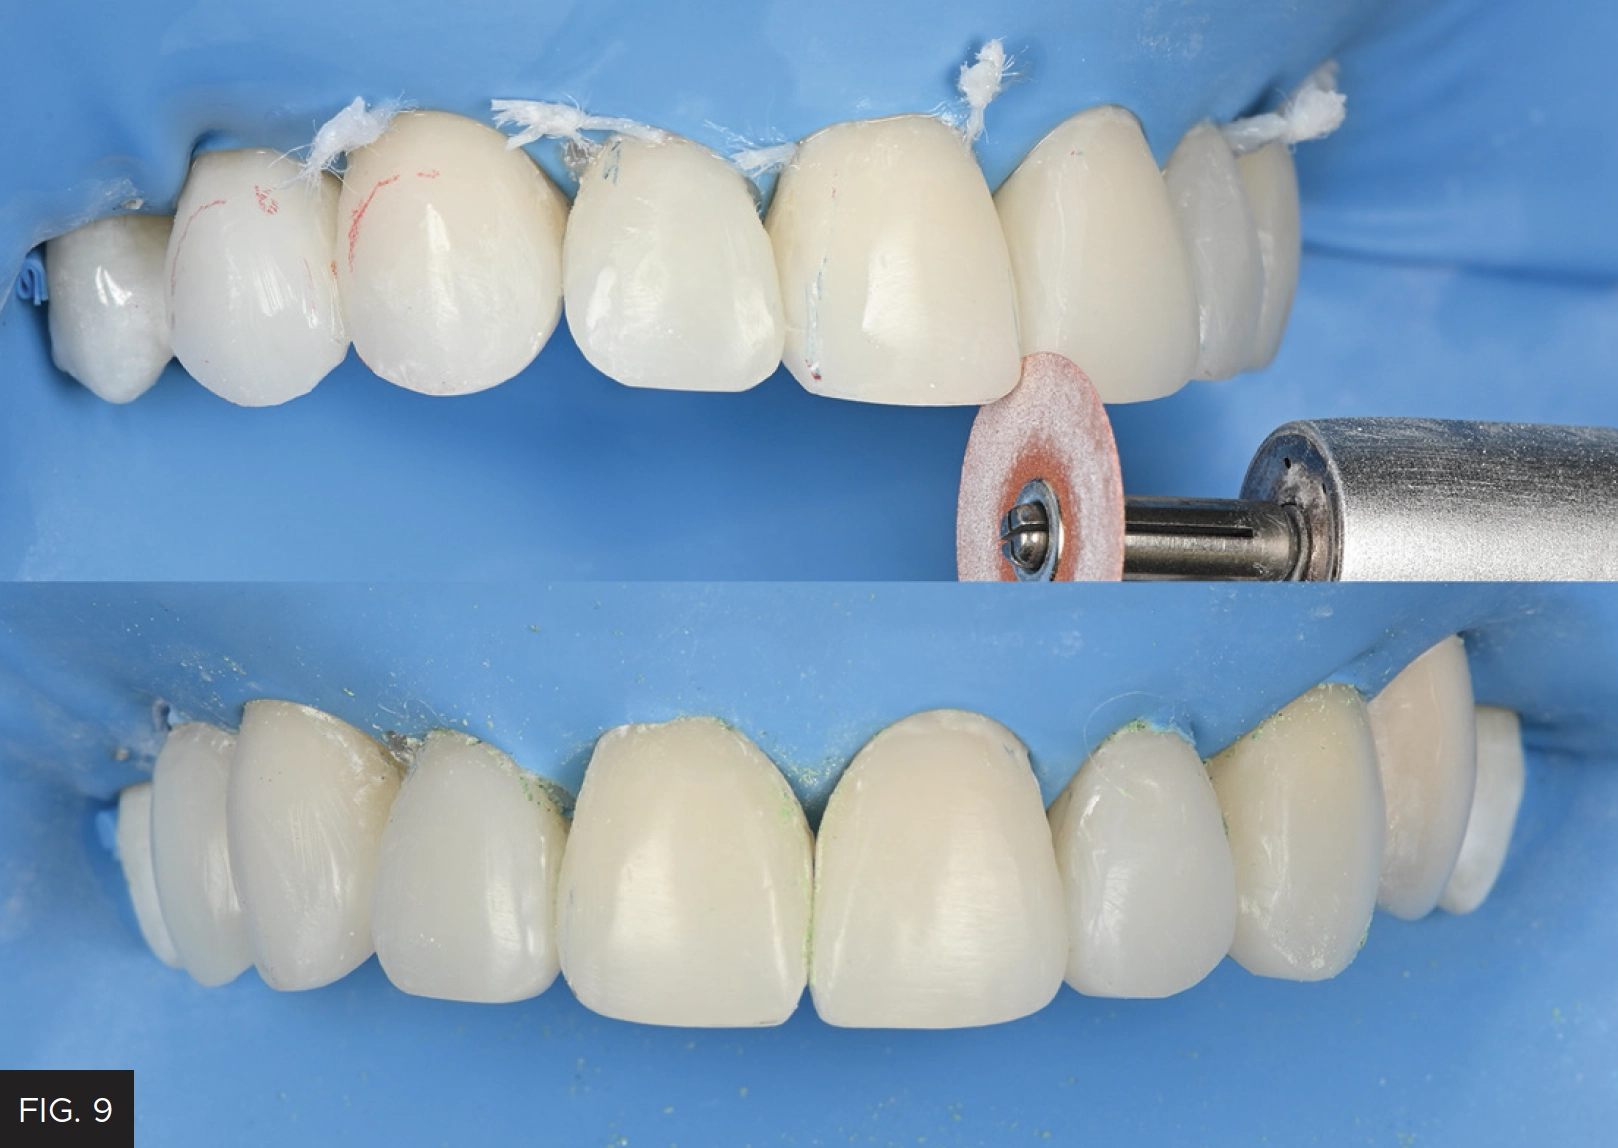
The four embrasure surfaces (i.e., incisal, facial, gingival, lingual) must be contoured to achieve the proper shape, respect contact point position, and ensure natural differences of embrasure sizes among the restorations.
Check #6: Point Angles
Point angles—the intersection of the line angle, embrasure, and incisal edge—should be a single point. In this case, it was modified and properly positioned using discs. (FIG. 10)
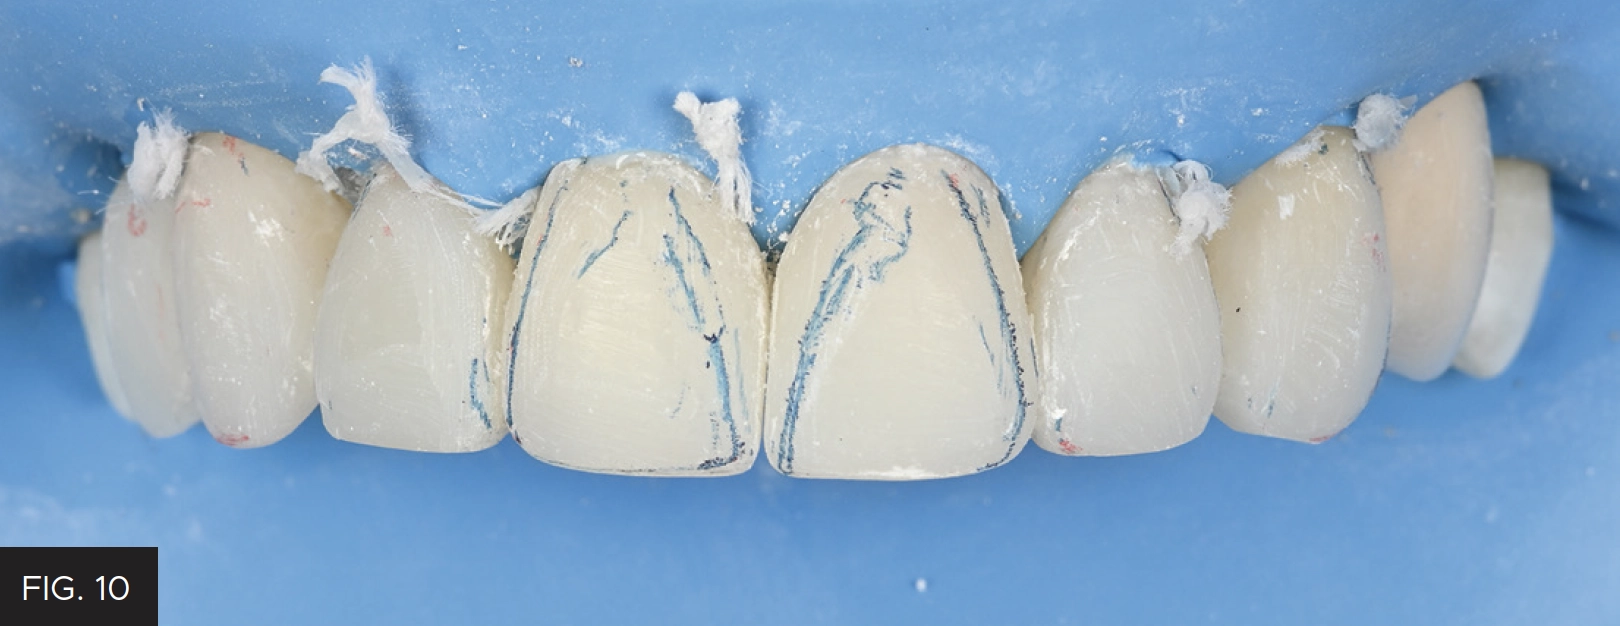
Discs are used to contour the point angle at the junction of the line angle, embrasure, and incisal edge.
Check #7: Axial Inclination
Every tooth in the arch is mesially inclined to varying degrees and must be respected for multiple anterior restorations. (FIG. 11) This is not as significant when contouring smaller restorations.
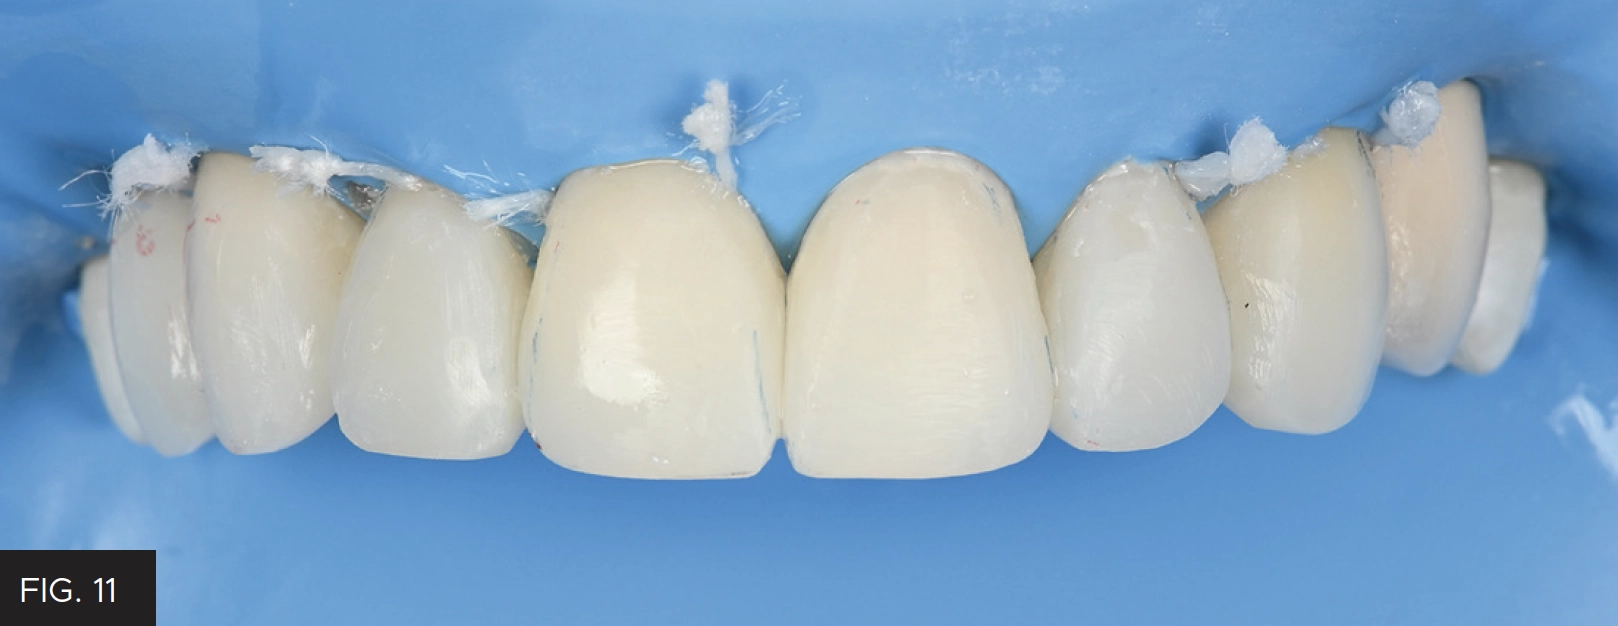
Every tooth in the arch is mesially inclined to varying degrees, and this axial inclination must be respected when multiple restorations are placed.
Check #8: Depressions and Elevations
The facial surfaces were penciled over to visualize the position of the depressions and elevations observed in the adjacent natural teeth and across the restorations. (FIG. 12) T hese attributes were imparted using a flame finishing diamond at about 10,000 RPM. Note that most anterior teeth have three main elevations and two main depressions. The mesial depression is generally longer, deeper, and narrower than the distal depression, which is wider and more curved. Combined, these characteristics form the elevation.
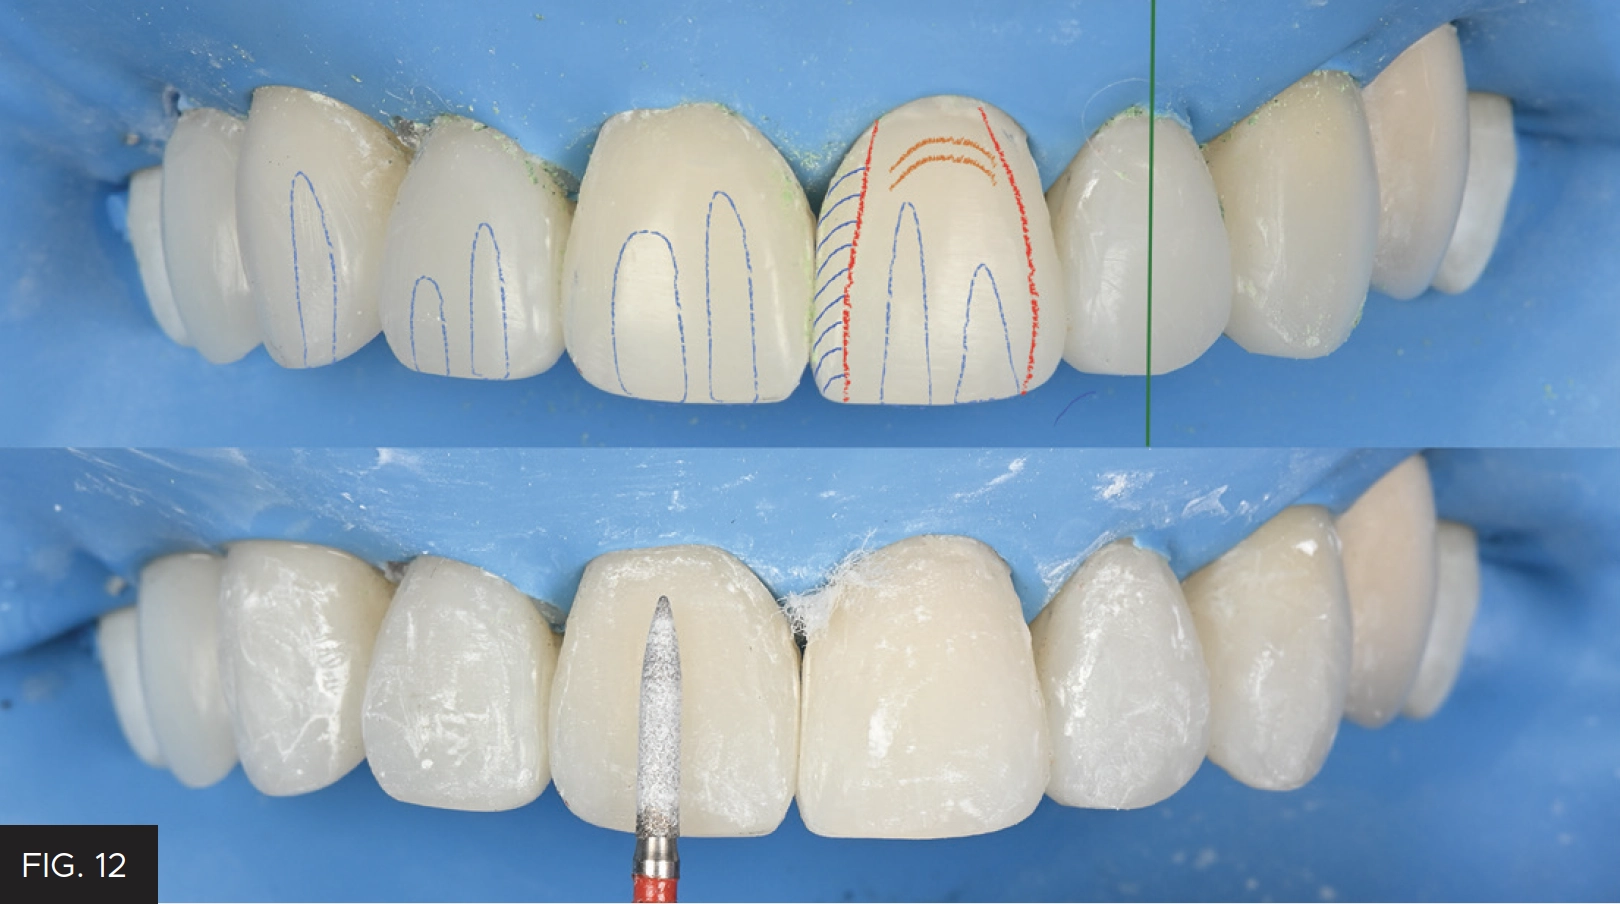
To ensure harmony, the naturally occurring depressions and elevations of adjacent natural teeth should be replicated in restorations by penciling over the facial surface to visualize their position.
Check #9: Surface Texture
Teeth are not smooth; perikymata and imbrication lines are most often present in young teeth and tend to become less defined and prominent with age or completely disappear with wear. Perikymata refers to several lines that cross the enamel surface from mesial to distal, and they parallel each other and break light reflection. (FIG. 13) Imbrication lines refer to deeper and much fewer lines in the cervical third. This texturing was accomplished by running a fine grit flame diamond in one single direction from mesial to distal at 3000 RPM.
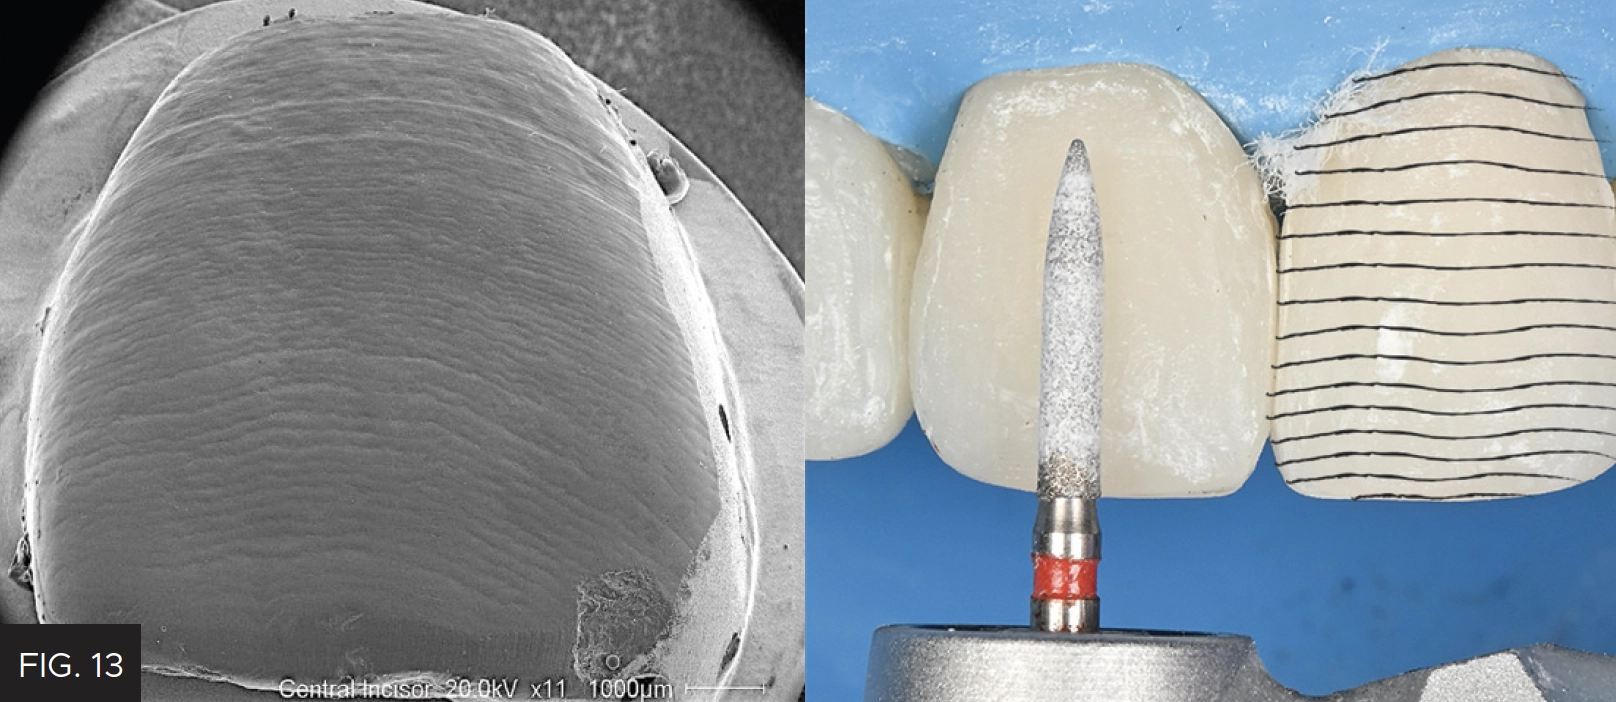
Imparting texture—which is comprised of several lines crossing the enamel surface—can be imparted by running a fine grit flame diamond from mesial to distal.
Check #10: Gloss
Final luster and gloss were achieved using sequentially decreasing grits of wheels, discs, or cups. In this case, a two-step diamond polishing system (A.S.A.P. All Surface Access Polishers, Clinician’s Choice) was used to impart a high gloss to the enamel surface. (FIG. 14)
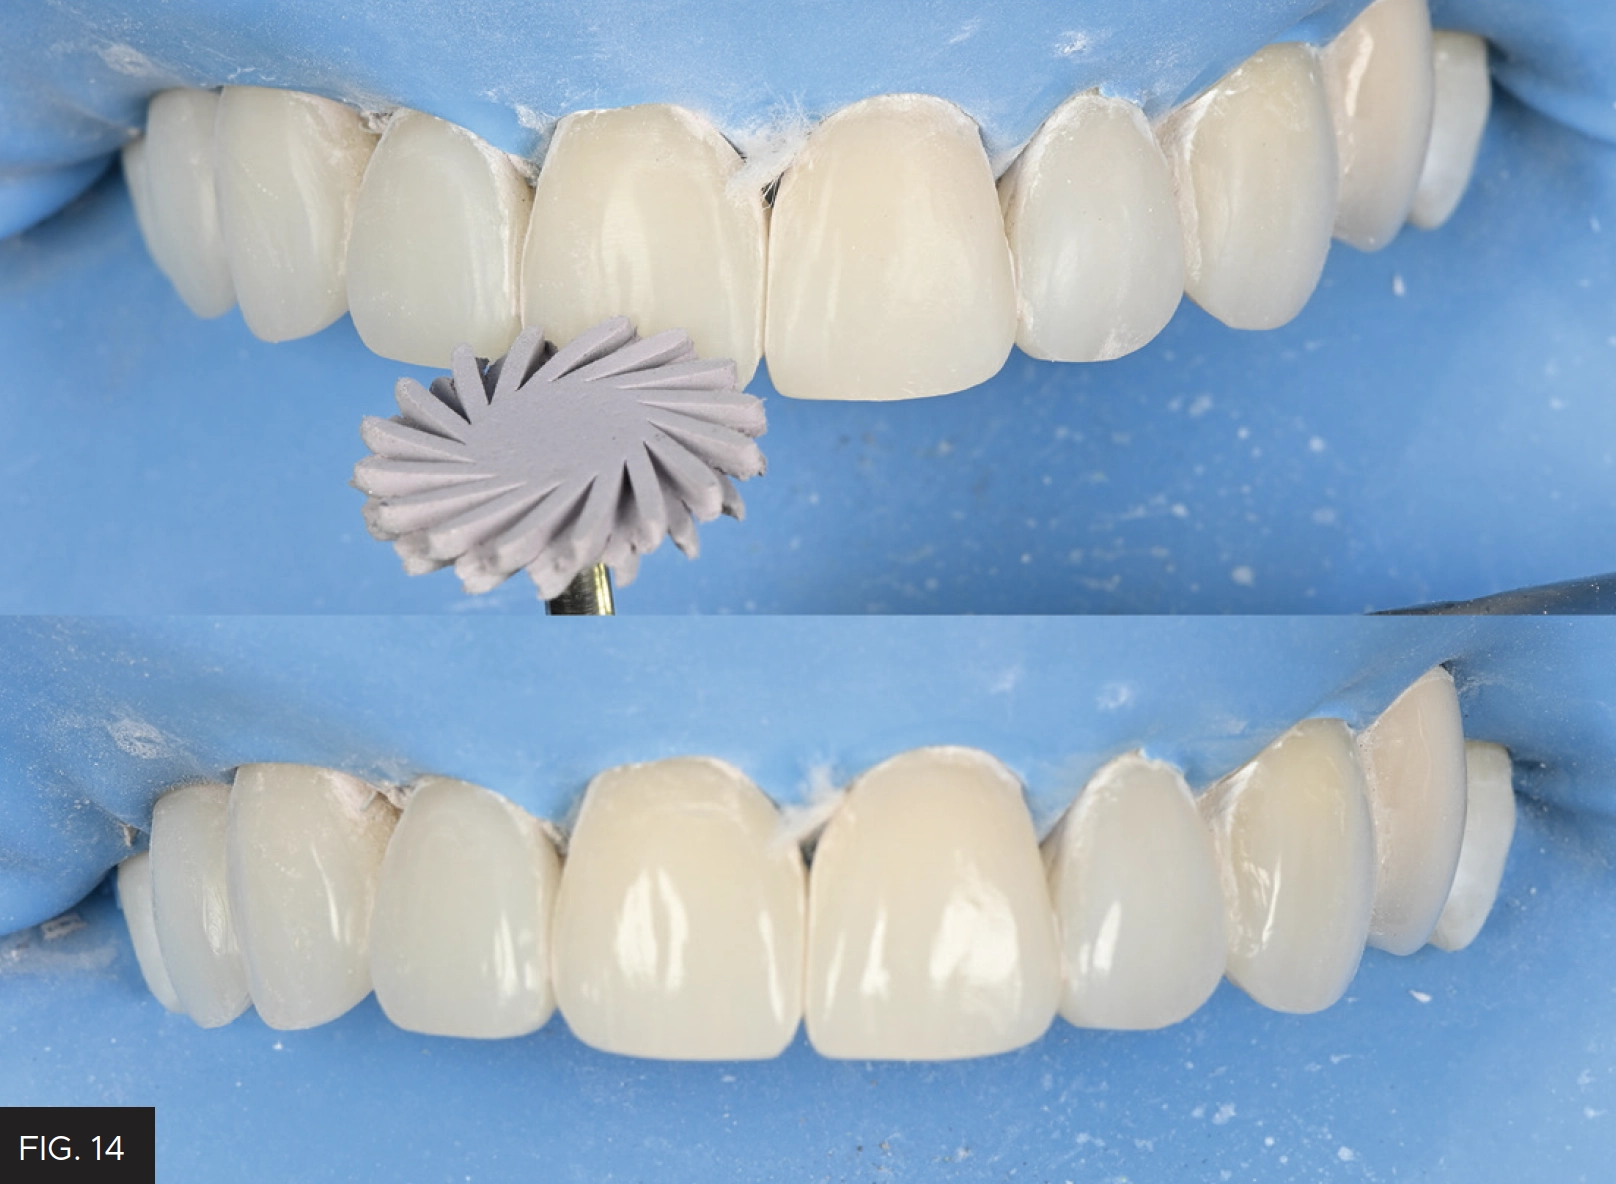
Final luster and gloss are achieved using sequentially decreasing grits of wheels, discs, or cups.
Interproximal finishing and polishing was initiated by using a #12 scalpel blade to remove excess adhesive remnants. In some cases, if larger excess exists, it should be removed using a medium grit diamond strip (VisionFlex, Brasseler USA). Final polish was performed using decreasing grits of polishing strips (Epitex Strip, GC America). Dental floss was then used to ensure no overhangs and rough areas were present and proper interproximal polishing was obtained. Final restorations after weeks of placement can be appreciated in Figures 15 to 17.
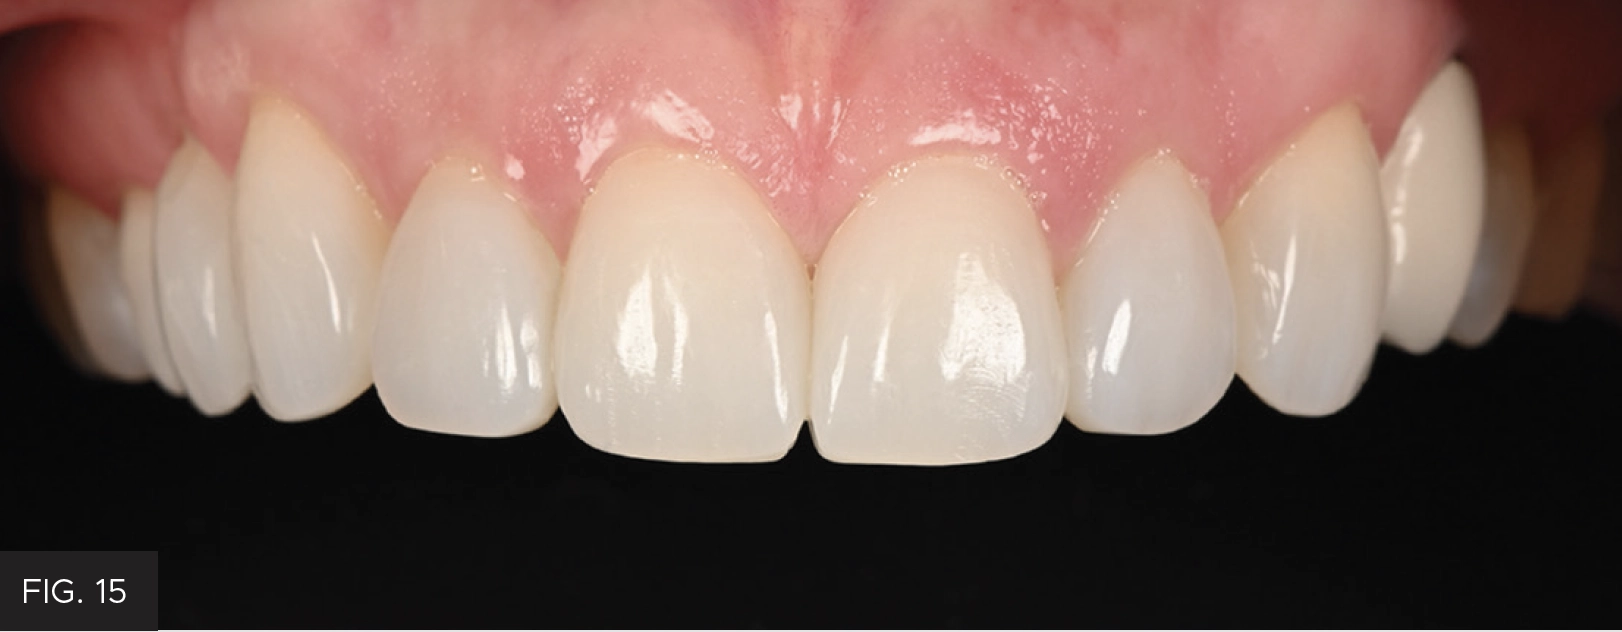
Close-up retracted post-operative view of the completed restorations demonstrating anatomical harmony with the adjacent natural dentition.
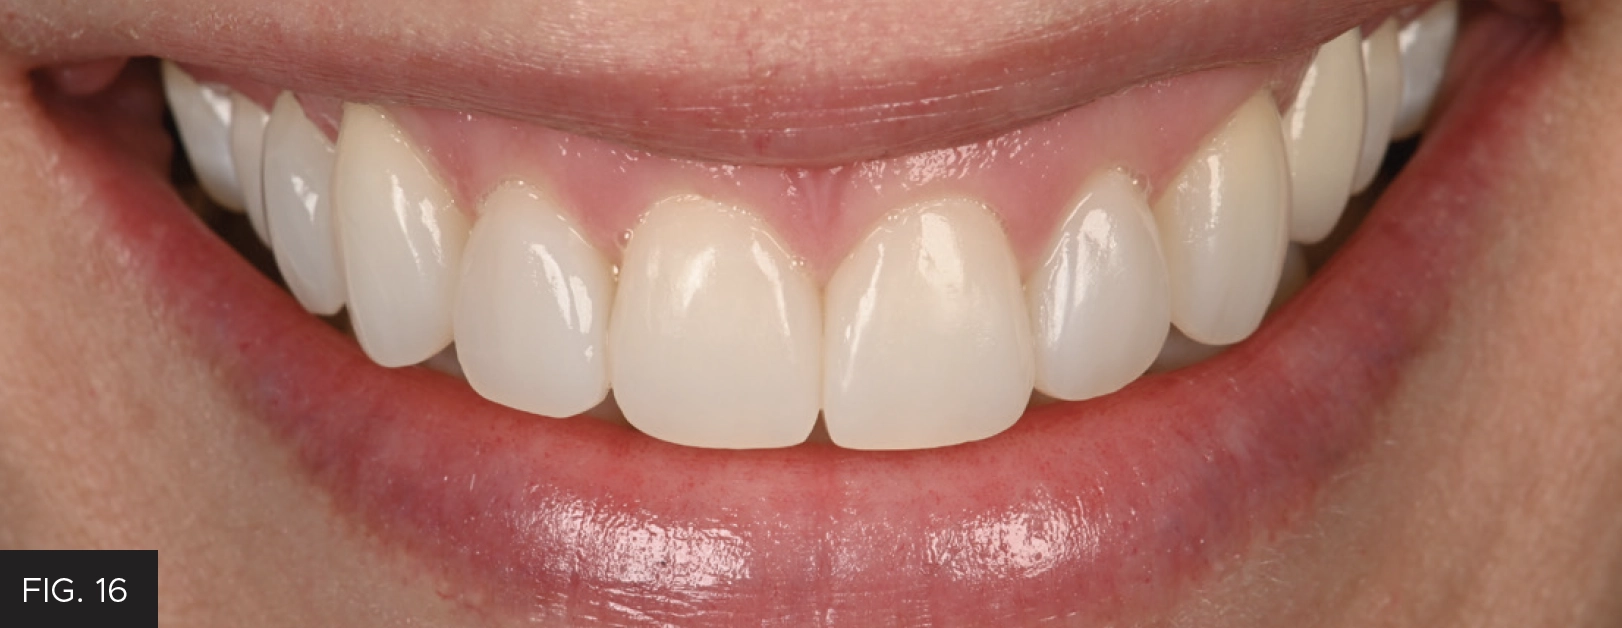
Close-up post-operative view of the patient’s natural smile.

Post-operative full facial smile view of the patient.
CONCLUSION
This clinical article describes a systematic checklist which expedites and facilitates contouring and polishing of patient’s anterior direct composite resin restorations.
Because it is deliberate and structured—with each step building upon the previous step—its systematic nature promotes predictability and efficiency. Although not all steps will be required for all restorations, reviewing them sequentially will contribute to esthetic restorative success in the anterior region.
REFERENCES
-
Dietschi D. Freehand composite resin restorations: a key to anterior aesthetics. Pract Periodont Aesthetic Dent. 1995;7(7):15-25.
-
Fahl N Jr, Denehy GE, Jackson RD. Protocol for predictable restoration of anterior teeth with composite resins. Oral Health. 1998;88(8):15-22.
-
Betrisey E, Krejci I, Di Bella E, Ardu S. The influence of stratification on color and appearance of resin composites. Odontology. 2016;104 (2):176-183.
-
Devoto W, Saracinelli M, Manauta J. Composite in everyday practice: how to choose the right material and simplify application techniques in anterior teeth. Eur J Esthet Dent. 2010;5(1):102-124.
-
Paravina RD, Kimura M, Powers JM. Color compatibility of resin composites of identical shade designation. Quintessence Int. 2006;37(9): 713-719.
-
Vanini L. Light and color in anterior composite restorations. Pract Periodont Aesthet Dent. 1996;8:673-682.
-
N1 G, Yilmaz F. The effects of finishing and polishing techniques on surface roughness and color stability of nanocomposites. J Dent. 2012;2:e64-e70.
-
Abzal MS, Rathakrishnan M, Prakash V, et al. Evaluation of surface roughness of three different composite resins with three different polishing systems. J Conserv Dent. 2016;19(2):171-174.
-
Coachman C, Calamita M. A tool for treatment planning and communication in esthetic dentistry. Quintessence of Dental Technology. 2012;35:1-9.
-
St-Pierre L, Bergeron C, Qian F, et al. Effect of polishing direction on the marginal adaptation of composite resin restorations. J Esthet Restor Dent. 2013;25(2):125-138.

ABOUT THE AUTHOR
Dr. Marcos Vargas attended Cayetano Heredia University School of Dentistry in Lima, Peru and graduated in 1985. He spent two years, 1990 to 1992, in the AEGD program at the Eastman Dental Center in Rochester, NY. Dr. Vargas received his Certificate and Master’s Degree in Operative Dentistry in 1994 at the University of Iowa where he is currently a Professor in the Department of Family Dentistry. Dr. Marcos Vargas has published extensively in the area of dental adhesion and composite resin for over 25 years. He maintains a private practice limited to Operative Dentistry with an emphasis on esthetic dentistry.

ABOUT THE AUTHOR
Dr. Bob Margeas graduated from the University of Iowa College of Dentistry in 1986 and completed his AEGD residency the following year. He is currently an adjunct professor in the department of Operative Dentistry at the University of Iowa. He is Board Certified by the American Board of Operative Dentistry. He is a Diplomate of the American Board of Aesthetic Dentistry, a Fellow of the Academy of General Dentistry, American Society for Dental Aesthetics and International Team of Oral Implantologists (ITI). He has written numerous articles on esthetic and implant dentistry, and lectures and presents hands-on courses nationally and internationally on those subjects.
Share This Article! Choose Your Platform
Products Mentioned in this article

Related Articles

Take 5: 5 Restorative Clinicians’ Take on A.S.A.P. All Surface Access Polishers
5 Restorative Clinicians' Take On A.S.A.P. All Surface Access Polishers.
Ask the Expert: An Interview with Jihyon Kim, DDS on Polishing Systems
By Jihyon Kim, DDS
What are the benefits of achieving a high gloss polish with restorations?
An Effective Ceramic Polishing Technique in Everyday Practice
By Fred H. Peck, DDS, FAACD
Placing permanent ceramic restorations in our patients’ mouths is an everyday occurrence for the restorative dentist. These restorations help to restore lost tooth structure, stabilize the occlusion, replace missing teeth, and improve esthetics. The final surface texture must be smooth and polished for patient comfort and to prevent damage to opposing teeth.
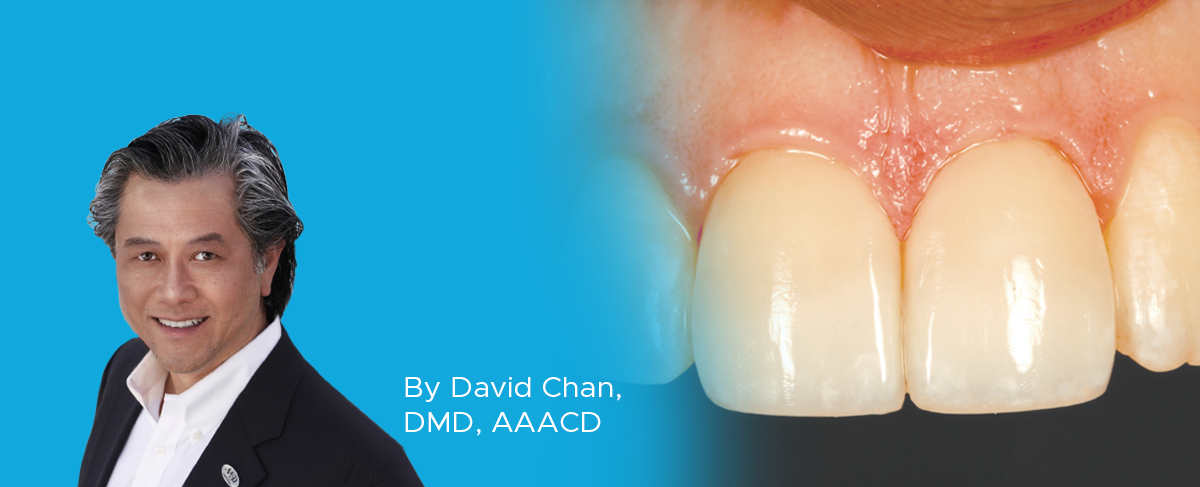
Success and Predictable Results with Anterior Composites Every Single Time
By David Chan, DMD, AAACD
The ability to rehabilitate or enhance a smile using direct composite restorations in the esthetic zone can be considered the ultimate challenge for the cosmetic dentist.

Facially Driven, Single Opacity Composite Veneers
By Mark Bowes, BDS Rand
Tooth wear has become a common problem, and today it affects both young and old patients. Ceramic veneers have been the standard treatment for many years. However, patients today are looking for more conservative and more cost-effective ways to treat missing, diseased, and unsightly tooth structure.

Simple Concepts to Shape and Polish Anterior Composites to Rival Porcelain
By David Chan, DMD, AAACD
With contemporary direct composite systems, the clinician can now truly be a dental artist by conservatively and esthetically creating restorations that are so life-like that they virtually emulate the beauty of natural tooth structure.